Media Browser is a software program that can get your digital media organized and beautiful in a hurry. In addition, you can easily access your media from inside or outside your local network. It has a server module that runs as a service so you can access all the administrative tasks as well as your content via any web browser. The server is available for Windows, Mac, Linux, and Freebase.
I still prefer using Kodi (XBMC) for my media center client, but having a media browser server will give you
- A way to quickly update your library metadata and artwork
- It will also give you a nice web interface to watch your media away from home or on a device that is browser based only such as a chromebook.
There is a media browser addon for Kodi, but I do not really see the point if you have direct access to your nas or share drive on your network. I just scan my movies into Kodi directly.
This guide will cover
- What you need for Media Browser
- What it is and how to install it
- How to get your media metadata and artwork how you want it
- How to access your media from anywhere
What you need
First you will need to designate a pc to run the server software. Keep in mind it is a service that runs in the background so you do not need a dedicated box.
Machine requirements are fairly small.
Minimum Requirements — no transcoding
Intel Core 2 Duo processor 1.6 GHz or better
At least 1GB RAM for Windows/Mac OS X
At least 512MB RAM for Linux
Windows: Vista or later
OS X: Snow Leopard 10.6.3 or later
Ubuntu, Debian, Fedora, CentOS or SuSE Linux
Recommended Configuration — transcoding HD Content:
Intel Core 2 Duo processor 2.4 GHz or better
If transcoding for multiple devices, a faster CPU may be required
At least 2GB RAM
Windows: Vista or later
OS X: Snow Leopard 10.6.3 or later
Ubuntu, Debian, Fedora, CentOS or SuSE Linux
If you are just going to use the media browser server to update metadata and artwork or fanart, a bare bones machine will work great. If you plan to actually stream media to other devices where the machine will have to transcode your files then you will want a bit more power. Eitherway it doen’t take much of a machine.
Install and Configure Media Browser Server
We install and setup on a windows box for this tutorial.
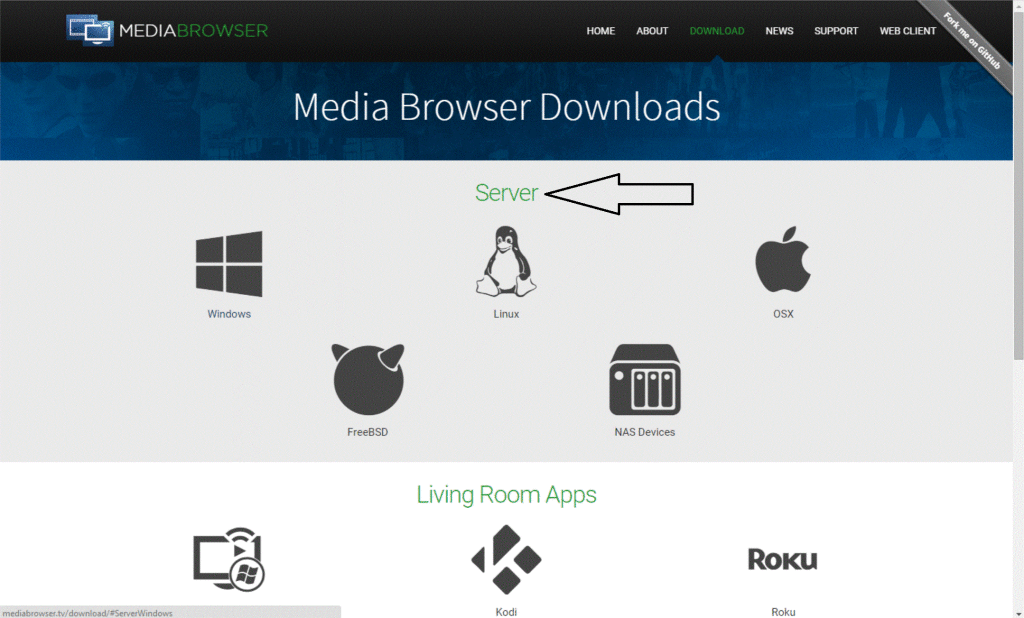
Download and install media browser 3 server version from here.
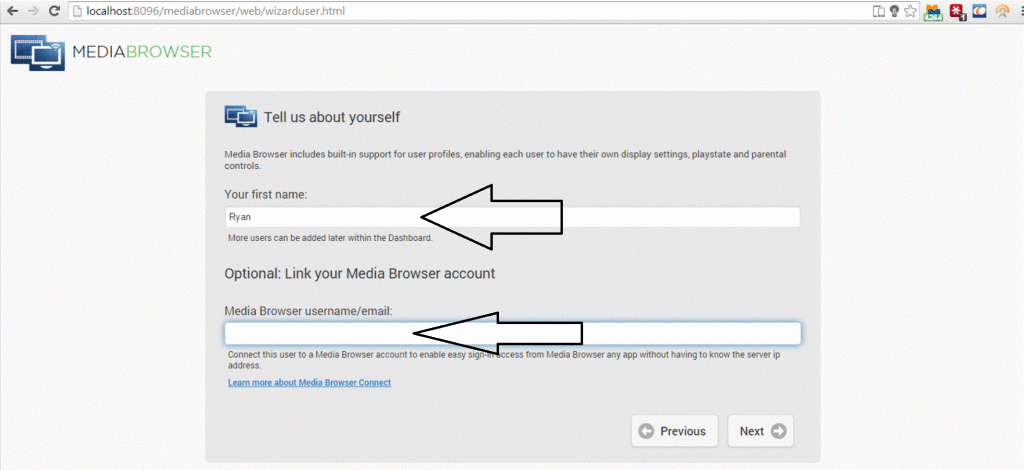
After you install the server software a web browser will open. This is where you will get everything configured starting with a user. Enter your name and your email.
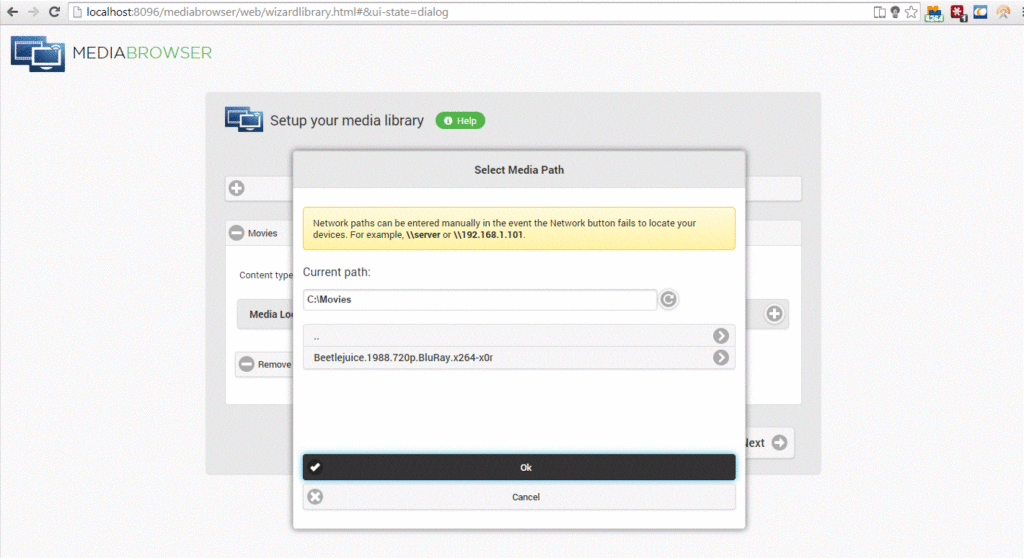
Now it will want you to add your media types and folder locations. You can add or update folders later if needs be. For now we will just set up a Movies Folder. So select content type for movies and name it Movies.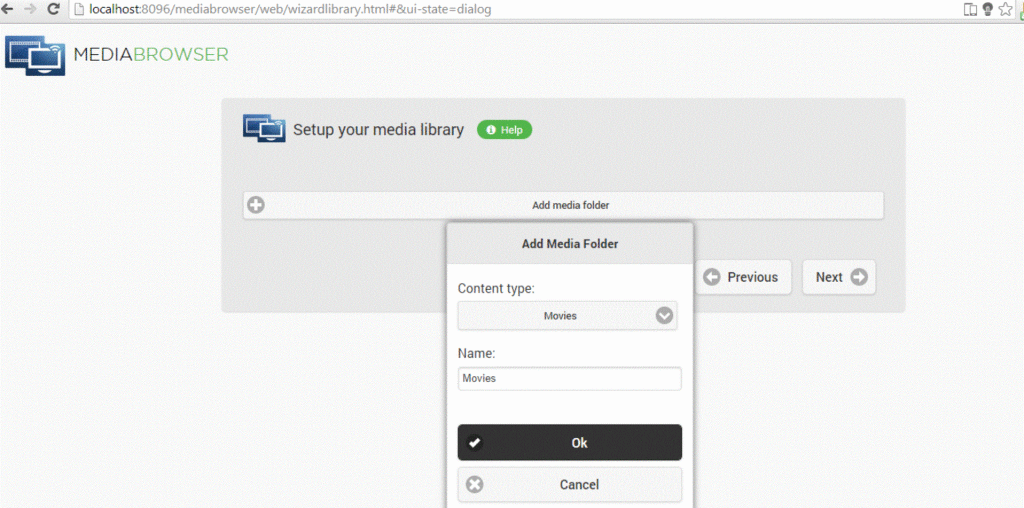
Enter the path or paths for your movie folders on your network.
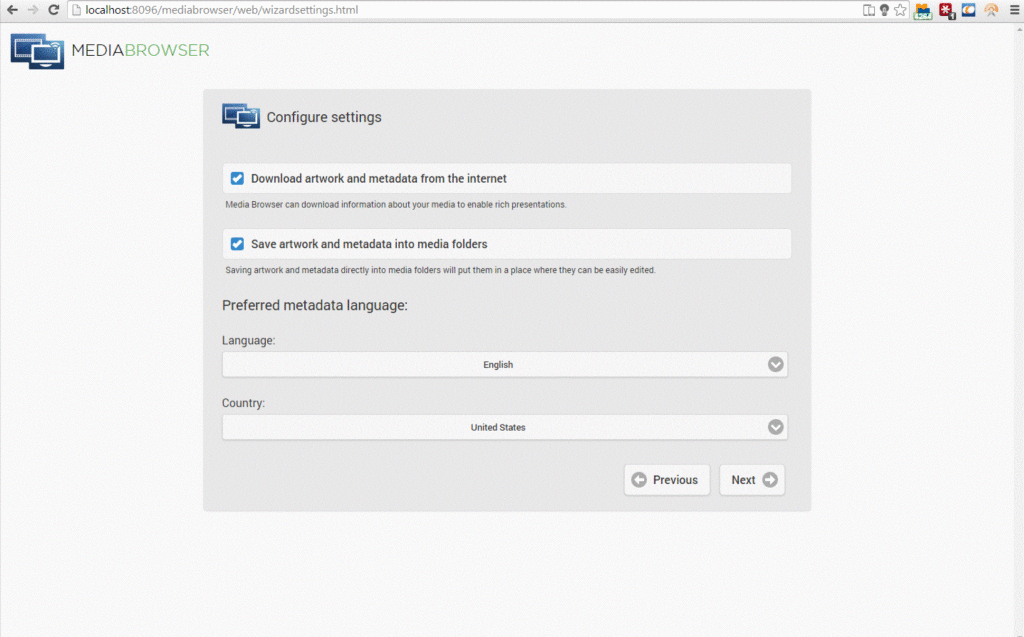
You will repeat these steps to add TV Show folders as well. Now it will ask you about metadata. In short metadata is all the information about your movie or TV show including poster or fanart artwork, episode information, cast information, etc.
I checked to both put that information in my actual media folders so other programs like Kodi can use the same data and get it from the internet.
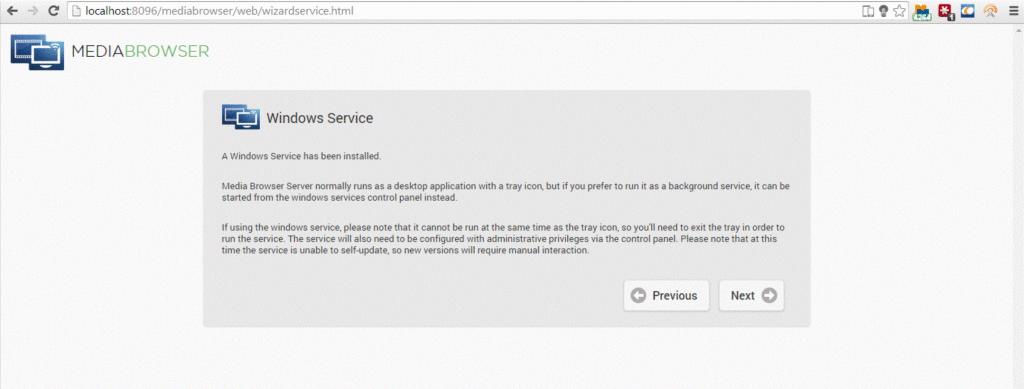
The next screen is just making you aware this is a service that you can access via the system tray.
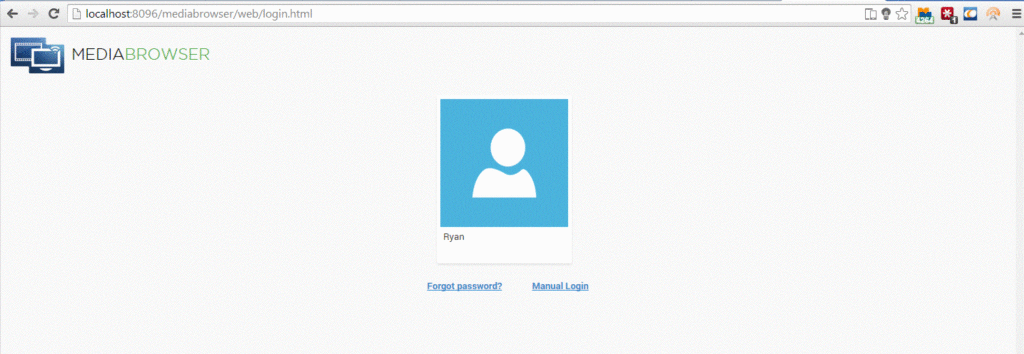
Now you get to the user screen. Select your user so you get logged into the service.
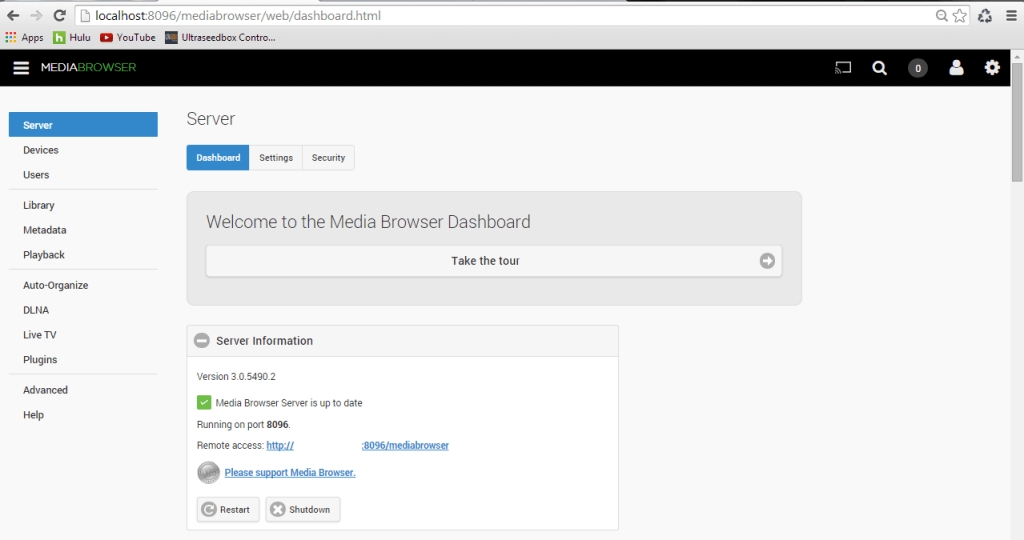
Now you are presented essentially with the server dashboard. Along the left are different settings you can adjust. Note: You can get back to the dashboard or server settings at any time by pressing the settings button in the top right hand corner.
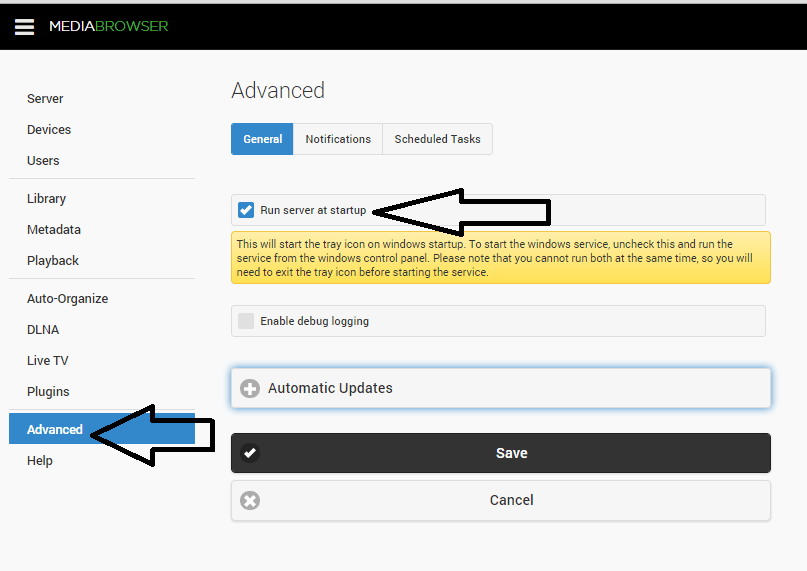
For the most part the server is configured out of the box how you would want which is a good thing. I do however recommend the first thing you do is setup media browser to start up with windows. This way if the pc reboots for updates or something else the service is running and you will have access especially while you are away from home. Click “Advanced” on the left column and check the box to “Run Server at Startup” and save.
Setting Up Your Media Folders
This should have been done during the setup for the most part, but if you select library on the left you will be able to see the content types and folder locations. You can see here I have a couple movie folders and a tv show folder.

Update Your Library’s Metadata
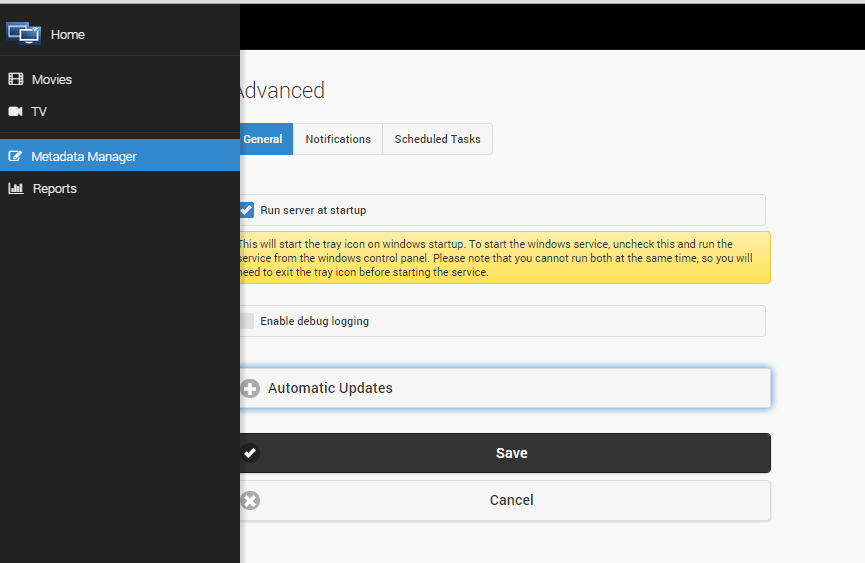
So now let’s go in and get updated metadata and artwork for our libraries. In the top left corner you will see the media browser logo and three lines. Hover over the three lines and you will be presented with your media folders, the metadata manager, and reports.
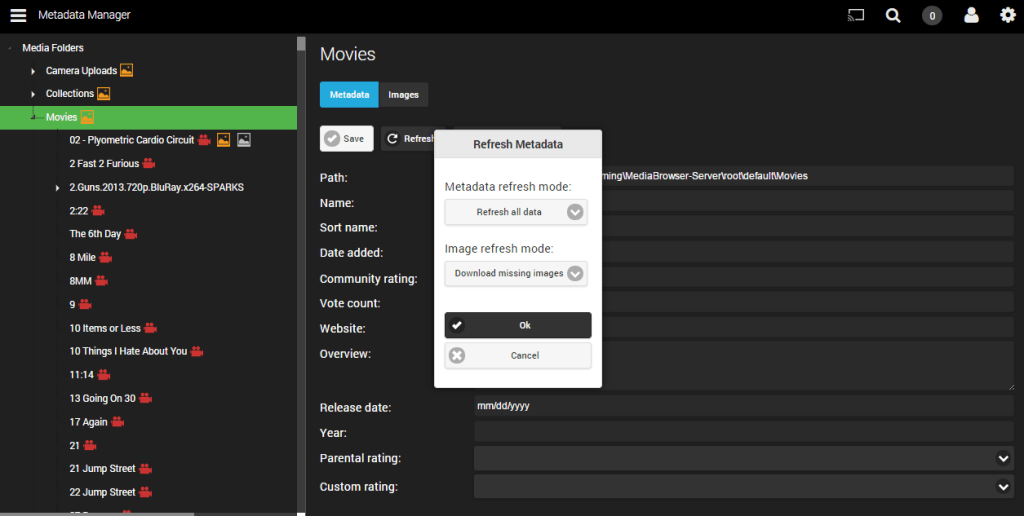
Select the Metadata Manager where you will be presented with some options. You can see my Movies and TV Shows with a small arrow next to them.

I will start by clicking on the arrow next to my movies which will give me the full list. Remember this could be multiple folders you configured which is nice because they will all show up as movies instead of you having to mange the multiple folders.
As you see your list of movies down the side, there will be icons showing what information is missing from that particular movie. It could tell you that the movie is missing a local trailer, back drop/fanart, logo, etc.
To short cut the individual movie modification if you want to update everything at once you can click the movies folder and click advanced refresh. Here you have a couple of options to refresh metadata from the web for everything or only movies missing data and the same for the artwork. When you hit OK it will take some time depending on the size of your movie folder. Media browser does a great job of updating your stuff, but not the best job at notifying you. They only give you a working circle so you do not really know how long it will take. Again, it will be determined if you are updating everything and the size of your library.
Fixing Movies Metadata
After you refresh, all you may want to examine if there are any movies labeled incorrectly or if they are missing items in the artwork. You may simply just want to pic different images. Movies could be missed if the naming conventions in your folder did not allow media browser to find an accurate match during the scrape. Here I will select the movie Pacific Rim as it was missing quite a few items.
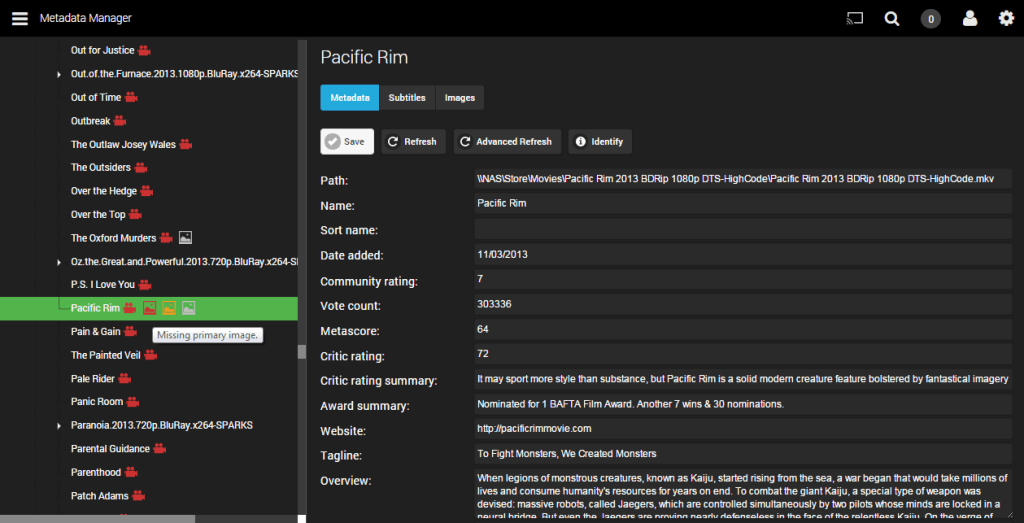
The first thing you may want to do is select the “Identify” button. This will help you ensure media browser and you are on the same page as to what movie this is. You can delete out most of the data and just leave the name of the movie if needs be. Media browser is going to do a search for you so make sure there is not other data in there causing problems with that search.

Upon the search it will show you the artwork of the movie information you are looking to collect. Click the correct movie from any of the options that come up.
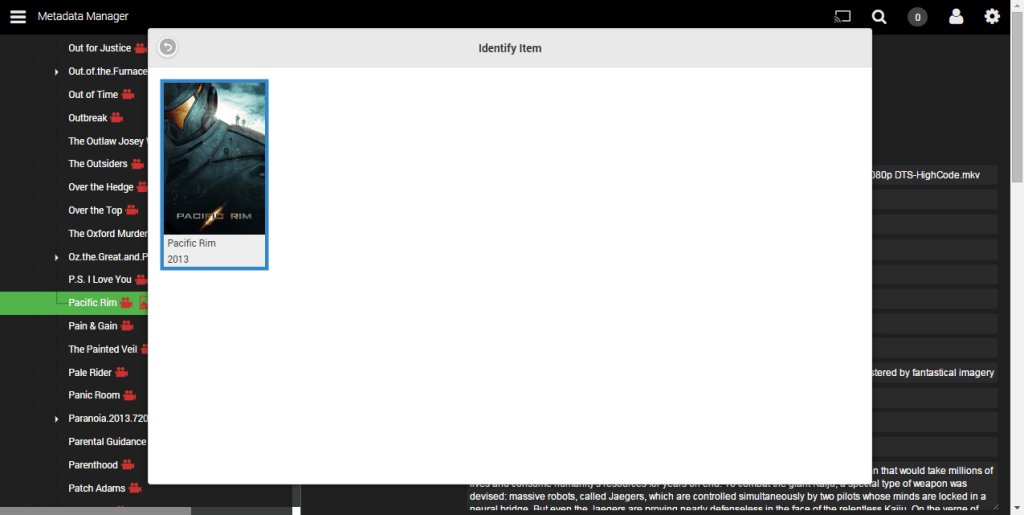
This will ensure you have the correct movie, then download the metadata and update artwork.

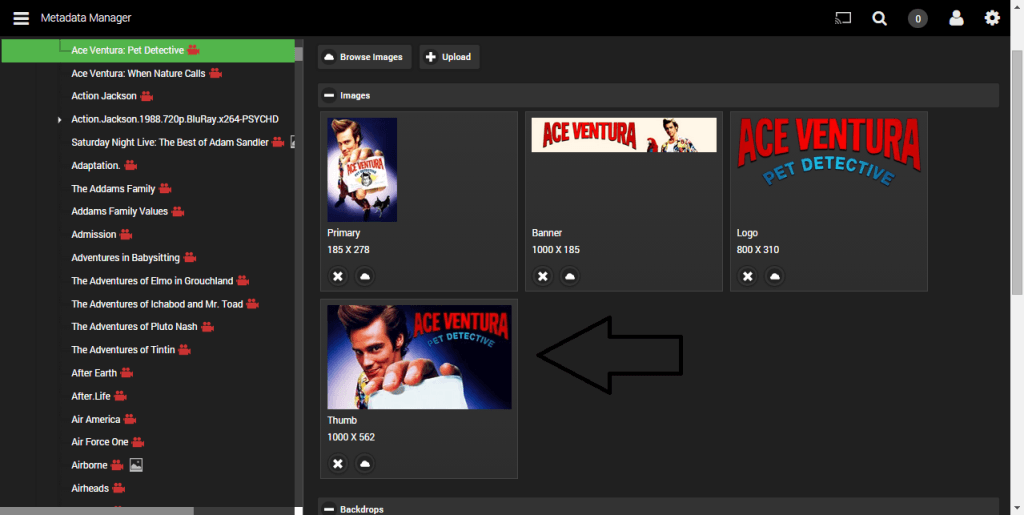
Selecting Different Images
Media browser give you a quick and powerful way to get the images you want for your media instead of the default ones it download. Select a movie and hit the images tab.

You can now click the button that looks like a cloud next to any of the images you want to change. We will change the fanart here.

Hit download and you will see the image has been updated.
Accessing and Watching Your Media
Now that you have your media metadata in check let’s actually enjoy it. Next to the Media Browser logo on the top left again hit or hover over the three lines. Select the “Home” option.
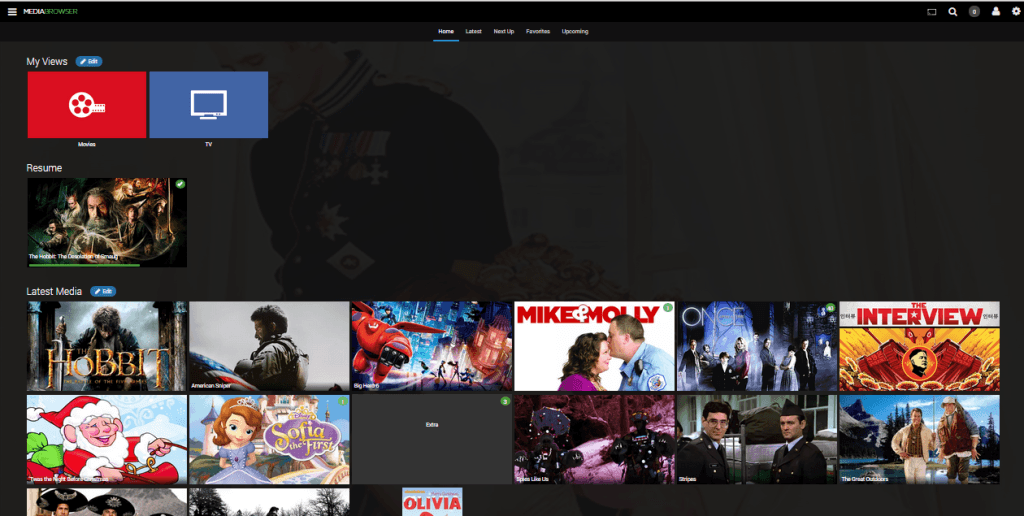
Here you will see your added libraries such as movies and TV shows in my case. It will also show you anything you were watching and new media that has been added. I will go into my movies.
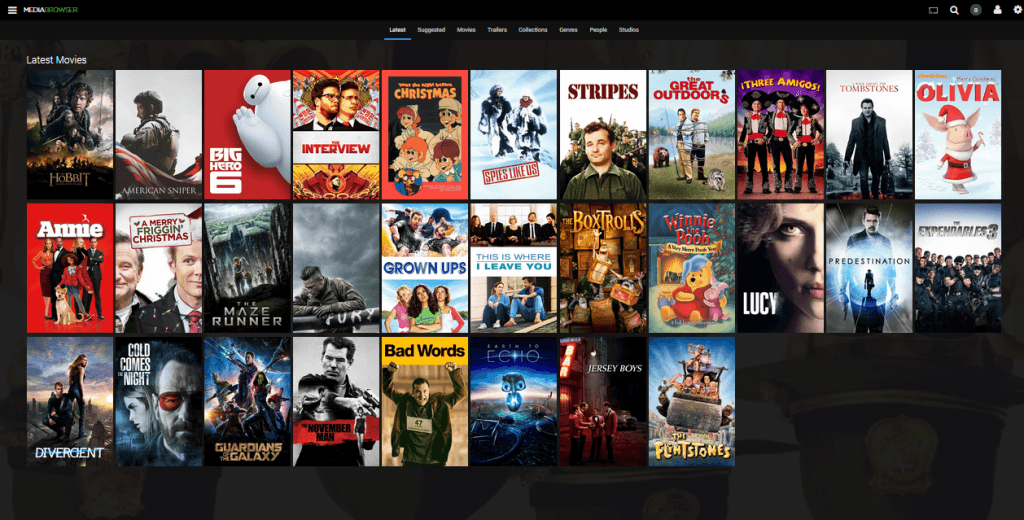
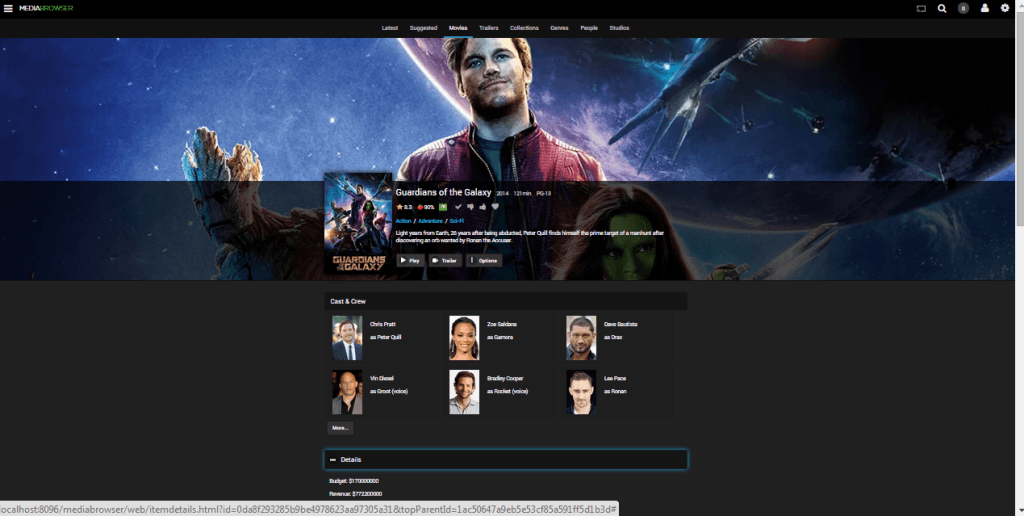
Here you really have familiar media center functionality. You can see all movies, latest, etc. If I go into one I will get all the movie data including cast, etc. I can play directly from here or view the trailer.
Accessing Your Media from Another Device
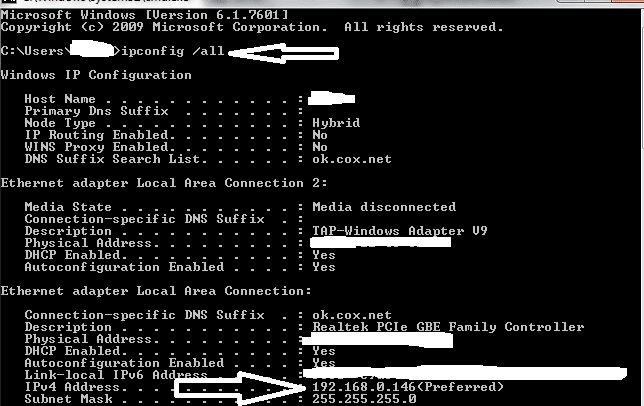
You need to get the IP of the server box. In Windows you can use the search feature and type in “cmd” to get a command prompt. Then type “ipconfig /all”.
Now you can open a web browser on another machine and find your media by typing the ipaddress:8096/mediabrowser and pressing enter.
You can also access it with many different clients such as Android, iOS, Roku, etc. The download information for the clients is here.
Access Your Media From Outside Your Network
These directions may vary a bit depending on your home router, but the mechanics should be the same. I have a Linksys brand router. We need to do a couple things.
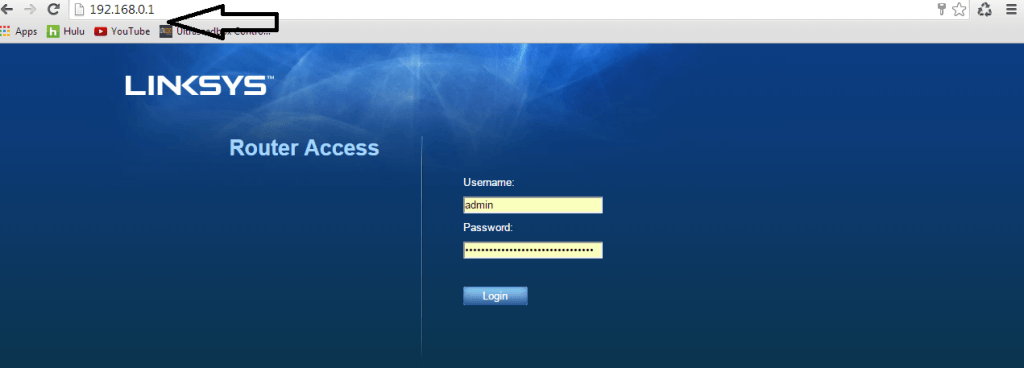
First log into your router by opening a web browser and typing in the routers address. Mine is 192.168.0.1 which is default for most routers. If it is not, then you have probably modified it yourself and know what you are doing for this part anyways.
We will need to do the following steps and I will walk through them one at a time.
- Set a static ip address for our media browser machine
- Enable remote access to our router
- Forward a port
- Get our external IP address
- Test
Set a static ip address for our media browser machine
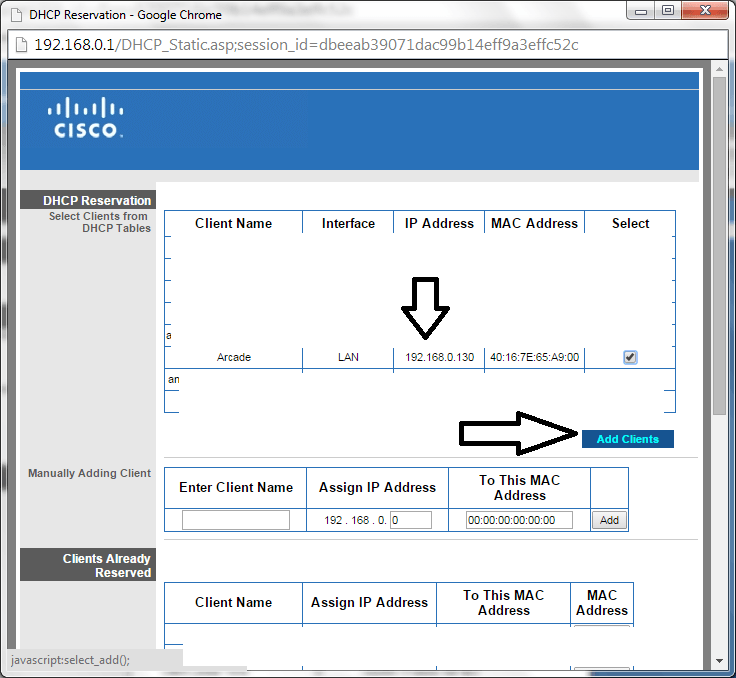
You will not want your media browser server continually changing ip addresses. Instead of setting it static on the machine you can reserve a certain address on your router for that machine. This way any time that machine connects to the router it will get assigned the same address. In my router I can click on the DHCP clicnt table and simply select that machine and reserve or “add client”.
Enable Remote Access to Your Router
By default access to your router from the outside is probably disabled. Under administration somewhere you should see something like “Remote Access” or “Remote Management” where you can enable and save that setting.
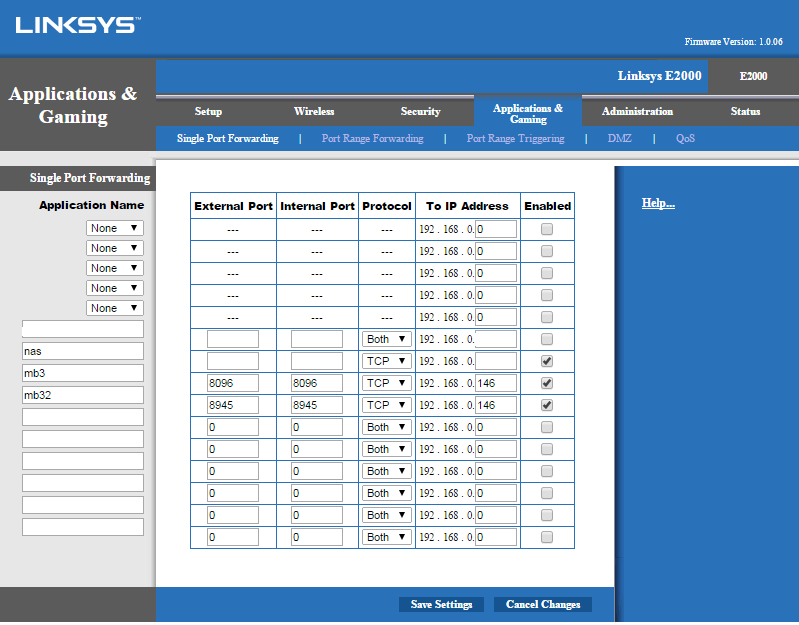
Forward a port
Do not get overwhelmed here. We essentially need to tell your router which computer is running your media browser server software. By default your media browser port is 8096. That is why above when we were testing our connection from another machine we typed ipaddress:8096/mediabrowser. In my router I can find the option for port forwarding under the “Applications and Gaming” tab. Find it in your router.
We have to put in two entries.
- name the first one mb (you can name it whatever you want)
- Your internal and external port will be 8096
- Protocol is TCP
- Then put in the last 3 numbers of the ip address of the machine running the media browser server
- Then Enable
We will do the same thing for port 8945 since some apps access through that port too.
Get Your External IP Address
Your external ip address will be vastly different than your internal. It is the address that allows you to find your router from the web someone outside of your house.

Test it
The easiest way to test if it is working is grab your smart phone and turn off your wifi connection where you are on 3g or 4g cellular. Open your mobile browser and type in “external ip address:8096/mediabrowser” press enter. If you get into media browser, congratulations as you can now access your media from anywhere in the world where they have internet. Note: don’t forget to turn your wifi back on and definately do not stream a movie on cellular!
Conclusion
So Media Browser is an awesome program especially to complement your Kodi and NAS setups. You now have great control on how your media reads and looks for all your media centers. You can also access your media from inside or outside of your house from any web browser or the media browser mobile app.
Please take a second and share out our site if this guide helped you. You can also visit our shop for high quality arcade parts and our blog for more guides like this.

Excellent detailed guide. Thanks for the effort
The point of the Media Browser kodi addon is that play states and resume points will be synced between all devices
That makes sense not having to update each Kodi box independently. I do have mine setup with a master database however, so probably why I missed that benefit. Thanks for the feedback.
Nice guide! Just curious about forwarding port 8945. Which apps need to use this? Does Mediabrowser also use this port? Thanks!