As you can see from the video ZenPoint Digital Music Center is a great tool if you want authentic feeling home jukebox software and have a large downloaded music library. If you do not have a lot of local music I would suggest our blog on streaming music/music videos as a jukebox here. That blog also has a lot of background on different ideas around making one.
Need music sensing LED lights for your project? Check these out from Amazon
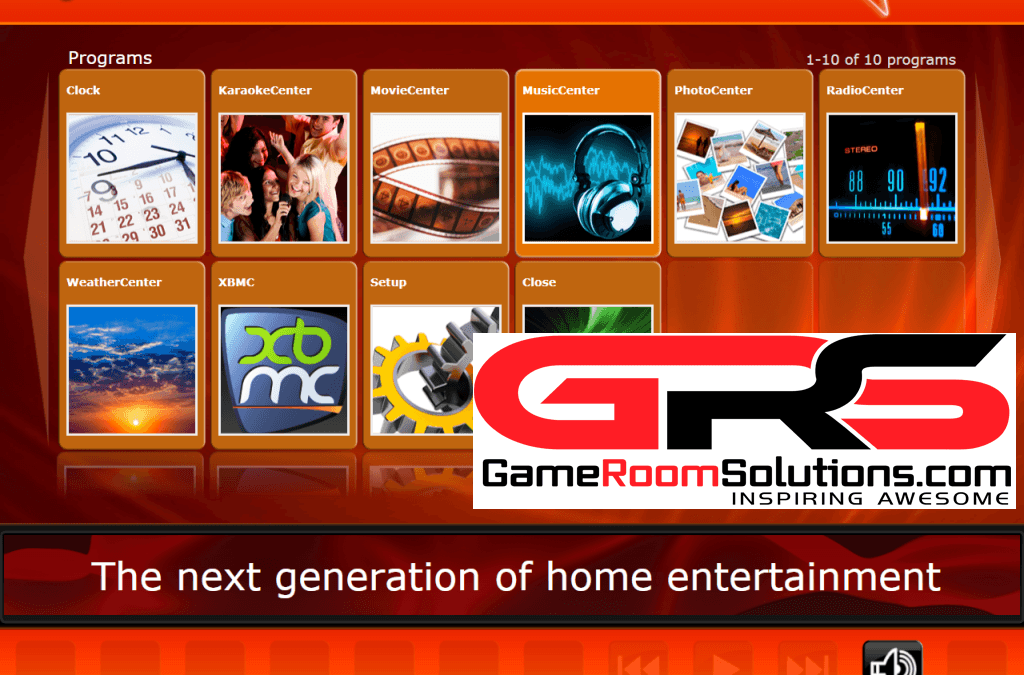
Here is our guide to get ZenPoint setup!
Software Setup
I tried multiple software programs, but ultimately chose ZenPoint Digitial Center. The interface is intuitive and gives a true jukebox feel. It also can do dual monitors and allow you to launch other programs. It did cost $35, but overall it is a good value compared to the other programs I evaluated.
So let’s get Zenpoint Digital Center set up.
Once you download you will see two main programs.
- Administration
- Digital Center

The External Programs tab is how I got Digital Center to have an XBMC button to launch into XBMC for music videos, movies, and TV shows.

- Click the “New” button at the bottom left
- Enter a name that you will understand
- Click the …box for the “File” field and navigate to the program you want to launch
- In this case I found the XBMC executable here C:\Program Files (x86)\XBMC\XBMC.exe
- Note find the Kodi launcher if you are on the latest release of XBMC now named Kodi.
- In this case I found the XBMC executable here C:\Program Files (x86)\XBMC\XBMC.exe
- Google XBMC icons under images and download the one you like
- Click the …box for the Icon field and navigate to the icon you downloaded
Now you are configured to launch XBMC directly from Digital Center. When you exit XBMC it will go back to digital center automatically.
The Skins Tab will allow you to change the look of Digital Center.

The Monitors Tab is where you simply tick the check box for another monitor if you have one on your setup. Digital center will automatically put the now playing on the second monitor. Note: When I did not have a second monitor in my cabinet, I ran to my TV via HDMI as a second monitor. This is so the now playing showed up on one of the HDMI inputs on the TV.

The Music and Movie Center Tabs are where you add the locations to your files. Simply press the “New” button on the right hand side and navigate to your folder.

Now that we have done some basic configuration and let Digital Center know where to find our files let’s go in and make sure everything is working.
Click Digital Center in the ZenPoint folder in Windows start menu. You will notice our XBMC launch on the main menu.

Click the Music Center icon and it will begin the import of your music.
Note: Once imported if you notice some of your artwork is fuzzy, then you need to get higher resolution artwork in your music files. 500×500 is perfect. If you have a large library and do not want to mess with it I suggest using a program called BLISS HQ. It is around $50 for unlimited fixes, but you can set rules like “Download artwork that is atleast 500×500 resolution” and forget about it.
Here is a shot of the Artist category

Finally hit the home button in the bottom right corner to return to the main menu and test that the XBMC launch button works. It should launch in full screen. If not simply hit the back slash “\” key on your keyboard one time and you will be good.
Good Luck on your project and please subscribe to our news letter!
Thanks,
Ryan

Would like to know how to make Zenpoint open at computer startup.
add the exe shortcut to your windows startup folder