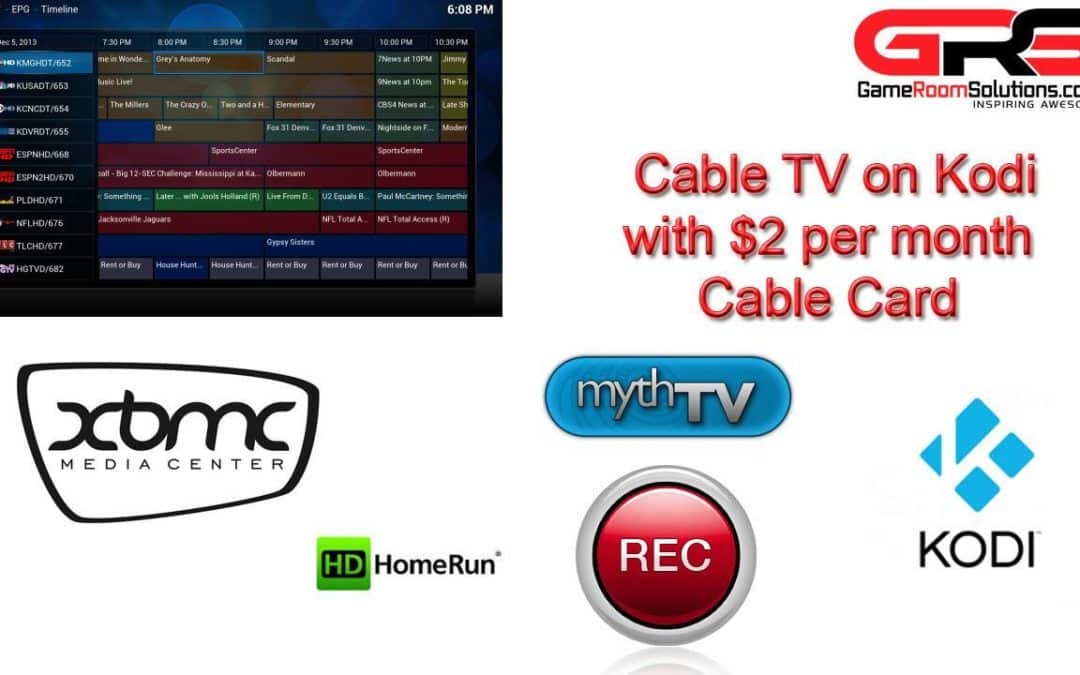
Setup Live TV on Kodi XBMC Using Cable Card, MythTV, and HDHomerun
My experience with running live tv through my XBMC or now known as Kodi boxes has been very favorable.
Why do this?
- I already have XBMC boxes in different flavors on every tv in my house so this setup saves me from changing TV inputs to another set top box provided by my cable provider
- Condense remotes (everything is integrated through one box)
- It also allows me to still have all the DVR/Program guide functionality we are accustomed to without paying the fees to my cable provider along with their box on each TV. Essentially I save around $50 per month in DVR/Set top box fees for around a $150 investment depending on what hardware you already have.
Did I mention it is really cool? Tip: you may want to keep your cable boxes or current setup in the interim while getting this going so you don’t upset the wife or kids. I suggest transition them slowly over a few days period once you have all of this working. You don’t want them to reject it before trying it as nobody likes change (except guys like us that attempt these projects).
Let’s get into the nuts and bolts of how to do it.
Needed Software/Hardware pieces explained
- Mythbuntu – This is simply your dvr software running on a dedicated pc or virtual box; I ran a dedicated dual core box with 4 gig of ddr2 ram and 1 tb hard drive without issues, but tested on a windows 7 box running virtual box
- Cable Card – This is a card issued by your cable provider that typically runs around $2 a month; it will allow you to receive the digital cable package you pay for without a set top box
- HDHOMERUN Prime or Dual – This is a physical box that you insert the cable card into and it will put your cable package out on your network for your MythTV software to utilize
- Schedules Direct feed – An electronic program guide feed that integrates with MythTV so you can have a guide no different that what a cable box does for you integrated right into your XBMC box; runs about $2 a month
- XBMC Kodi boxes – This is your XBMC box (htpc, amazon fire tv, raspberry pi, etc) where/how you get XBMC on your TVs. You can read our guide here if you are not familiar with HTPCs.
HDHOMERUN Prime and Cable Card
There are a few ways to capture/stream hd content through either cable card (for digital cable) or antenna (over the air). After extensive research I settled on the HDHOMERUN Prime for it’s price and simplicity along with no monthly fees. We could probably get away with just an over the air antenna, but my wife likes several shows on TLC, kids like Disney, plus I can get Monday Night Football on ESPN so we wanted to keep the basic digital cable package.
So what is the HDHOMERUN Prime?
It accepts a cable card from your cable provider and puts 3 tuners out on your network. This means you could watch 3 shows at once, record 2 and watch one, record 3, etc. Again, it will have available all the shows you subscribe to on your cable package.
Best price is at Amazon like everything else.
If you only want to get local stations like NBC, CBS, ABC, Fox, CW, etc then you could get away with the HDHOMERUN Dual. Essentially this guide will get you the same results where you can stream and record local stations in HD without paying for any cable packages because you will use an antenna to get content instead of the cable card. It will put 2 tuners out on your network (watch 1 and record 1 show, watch 2 shows, record 2 shows at the same time).
Amazon link to the Dual
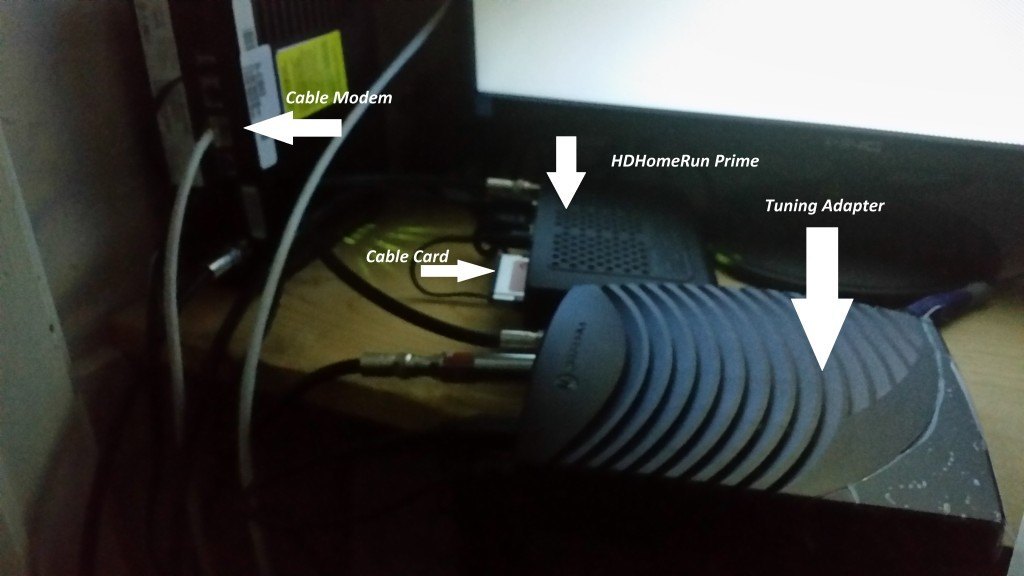
Cable Card
So in my area we have Cox cable, but that doesn’t really matter. Essentially you need a provider that provides an “M-Card” style which they all should. Just call your cable provider and tell them you want a cable card and they will provide one for around $2 a month. They also may provide what is called a tuning adapter which essentially plugs into your router to help with the signal (there is no charge for this). FYI: At&t Uverse is “TV over IP” not cable, so if you have them you will need to switch like we did.
Once you have the cable card in hand and cable services ready plug it into your HDHOMERUN prime and with the prime plugged into your network boot it up.
Get TV on your network!
HDHOMERUN Software Installation
- On a pc/mac/linux computer on your network, download and install the latest HDHomeRun software from downloads.
- Open HDHomeRun Setup
- On the Location tab, set the Country and Zip/Postal Code
- On the Applications tab, set the Main Application to XBMC
- On the Tuners tab, set the Signal Source to CableCARD for each of your HDHomeRun PRIME tuners.
- On the CableCARD tab, click Scan to download a channel list from the CableCARD. Uncheck the boxes for any channels you don’t subscribe to or otherwise don’t wish to see in Windows Media Player/HDHomeRun QuickTV. If you do not receive a channel list, this means the card has not yet received programming information from the cable provider. Follow the steps in the next section to activate the card.
CableCARD Validation
- Your CableCARD must be validated (paired) with your HDHomeRun PRIME in order to receive copy-protected content. This normally only needs to be done once, unless you switch to a different CableCARD, or insert your CableCARD into a different device.
- On the Tuners tab in HDHomeRun Setup, click on one of the Tuner IDs to access your HDHomeRun PRIME’s webpage. This can also be done by clicking the link on the Device tab in HDHomeRun Config GUI, or by directly navigating to the IP address of your HDHomeRun.
- Click on CableCARD Menu. In the CableCARD Status section, you will see the current status of the CableCARD in your HDHomeRun PRIME. Verify that Card Authentication and Card OOB Lock show success. If Card OOB Lock does not show success, this suggests that your HDHomeRun PRIME does not have a good cable connection. Verify that the TV cable is securely connected to the RF in port on your HDHomeRun PRIME and to the wall outlet or splitter.
- Follow your cable provider’s directions for validating your CableCARD. This normally involves calling the cable company or accessing a web page and providing the CableCARD ID and Host ID (and if using a Motorola CableCARD, the Data number) listed on this page. The validation process can take anywhere from 1-30 minutes depending on the cable provider. Refresh the Status page every few minutes to check to see if the process is complete, indicated by the Card Validation status showing success.
If successful at this point you can now view TV via the provided “Quick TV” software on your pc. This is a huge step once it is working.
Schedules Direct Feed
Now that you have your cable out on your network an important part of watching/recording TV is the program guide. You will need a “feed” similar to rss for your MythTV box to consume so you know what shows are when. This is a non-profit service that costs $25 per year. Save your time and just subscribe. I looked for free alternatives and it’s not worth the headace. It works out to around $2 per month so along with the $2 per month for your cable card you are still miles ahead of even one set top box from your cable provider and DVR service fees (Probably $20 a month for the first box and fees).
- Go to schedulesdirect.org
- Register and pay the $25 fee
- Once they verify payment you can create your feed
Click Add a line up and enter your zip code; this will give you available feeds in your area.

Select your service and it will add it. Once it is added click the edit button next to your feed so you can modify which channels you want to show up on your system. I went ahead and only added the HD version of the channels we subscribe to.
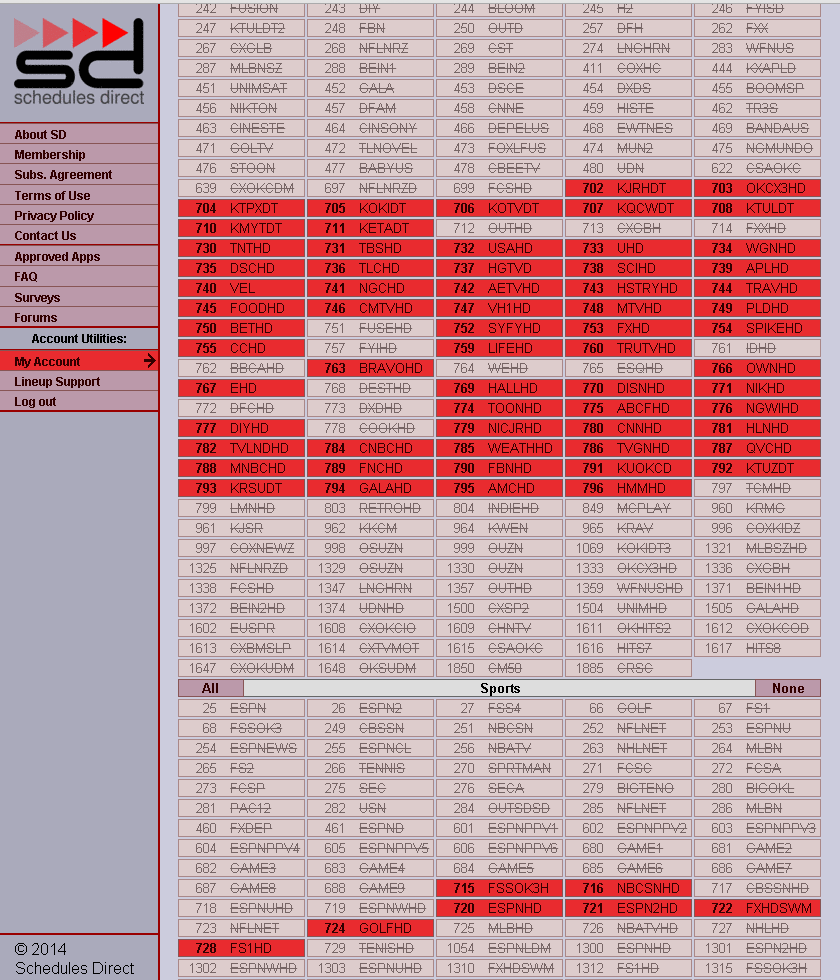
Once you have the channels you want selected click “save” at the bottom and you are done with this step!
Mythbuntu
Mythbuntu is a Linux distribution that comes ready to get your DVR going (Free like all Linux). Do not worry if you are not a Linux user, you can do this. Essentially you need a pc with some hard drive space. Again, I ran a dual core box with 4 gig of ddr2 ram and 1 tb hard drive without issues. I tested this in a virtual environment and it worked fine, if you already have a pc on your network and want to keep windows on it without dedicating the entire thing to Mythbuntu. I will blog the virtual route soon. You should be able to build a dedicated pc for around $200 with a 1tb hard drive that will run this fine.
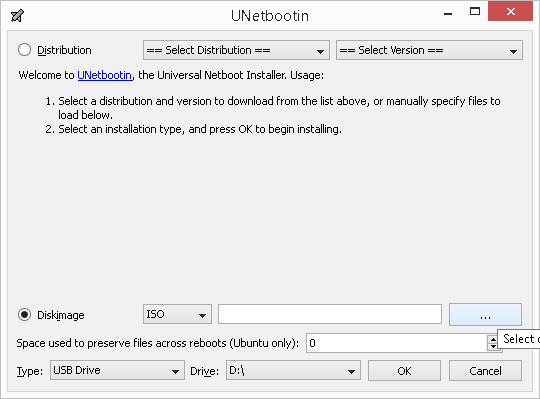
Download Mythbuntu. It is an iso file so you will need to either burn it to dvd or use a usb flash drive for the installation. I hate dealing with DVDs and also moving the dvd drives around on computers so I will show the flash drive way here, but essentially you will need an install media to load it on your soon to be MythTV box.
After you have the iso downloaded, I use a free program called Unetbootin to create my install flash drive. Get it here (you will want to download the version that matches the pc you are on which for most will be windows).
- Open UNetbootin
- Select “DiskImage”
- Browse to the Mythbuntu iso file
- Select your USB Key you will use for the installation by drive letter (you will get this key back to use for what you want when the installation is done, but it will erase it during this process)
- Press OK and grab a coffee or beer as it takes a few min to complete
Once it completes you now have a usb key that is ready to install Mythbuntu on the computer that is going to run it permanently.
Insert the USB key into the soon to be mythtv server and boot to the key. Install the software. It will ask you basic questions like time zone, etc.
Steps/Screens
- Language
- Time Zone
- Keyboard layout
- Disk space (probably want to use the entire disk so you can have plenty of dvr room)
- Name and password (your mythtv password will be different in later steps)
- Standard Installation
- You will want to setup “Primary Backend w/ Frontend”
- Select the default to include all MythTV plugins
- Check the box for themes
- Important check MythTV Service box along with any other services you want to run like ssh
- Setup a MySQL Server Root Password “remember this password”, I do not have a password for Mythweb
- If you are using a remote set it up here, however I use an android app called “Yatse” which you can see in the video at the top of this blog so no remote needed in this step
- Drivers – select the drivers for your computer type
Once installed I want to walk through the settings of the MythTV backend. You will ultimately be presented with a menu screen on the MythTV backend.
- General
- Capture Cards
- Recording Profiles
- Video sources
- Input connections
- Channel Editor

Let’s start by adding your “Capture card” or the HDHOMERUN
Select Option 2 then “New Capture Card”

You will want to select
- “HDHomeRun networked tuner
- Manually Enter IP Address
- The IP address of your HDHomeRun
- Then the tuner number so for the first one you will put “0” here
- click recording options and set the Max recordings to 1 (because you can only use this tuner for 1 task)

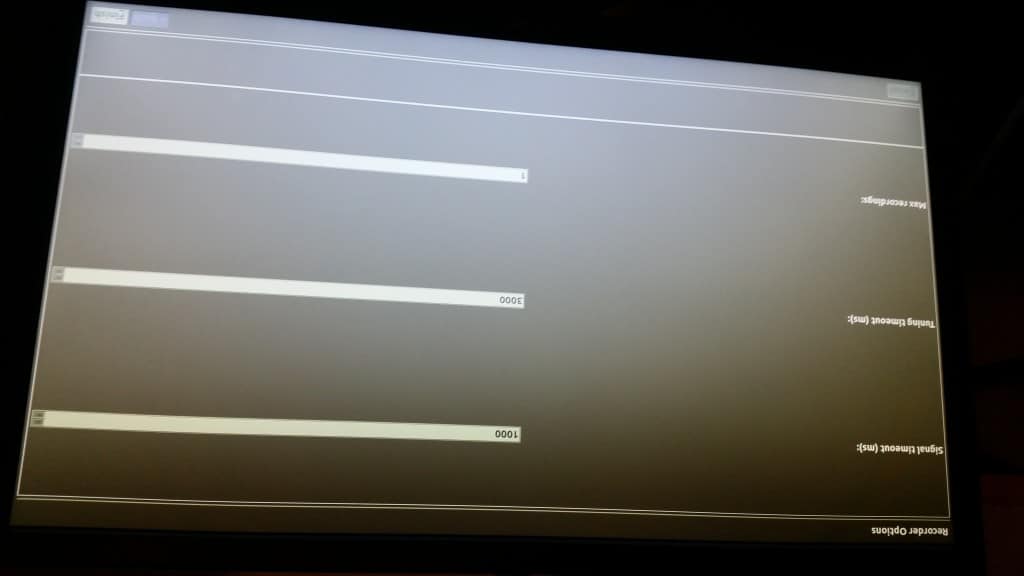
We have to do this 3 times for the HDHomeRun Prime or 2 times if you bought the Dual version. Each time you set it up you will increment the “Tuner” by 1. When you are done you will have all tuners in the system and it will look like the following.
So now your MythTV box knows about the HDHomeRun lets get the program guide pulled in. Press “esc” and go back to the original menu and select option 3 “Video Sources”. This is where we will want to add the schedules direct feed you setup earlier in the blog.
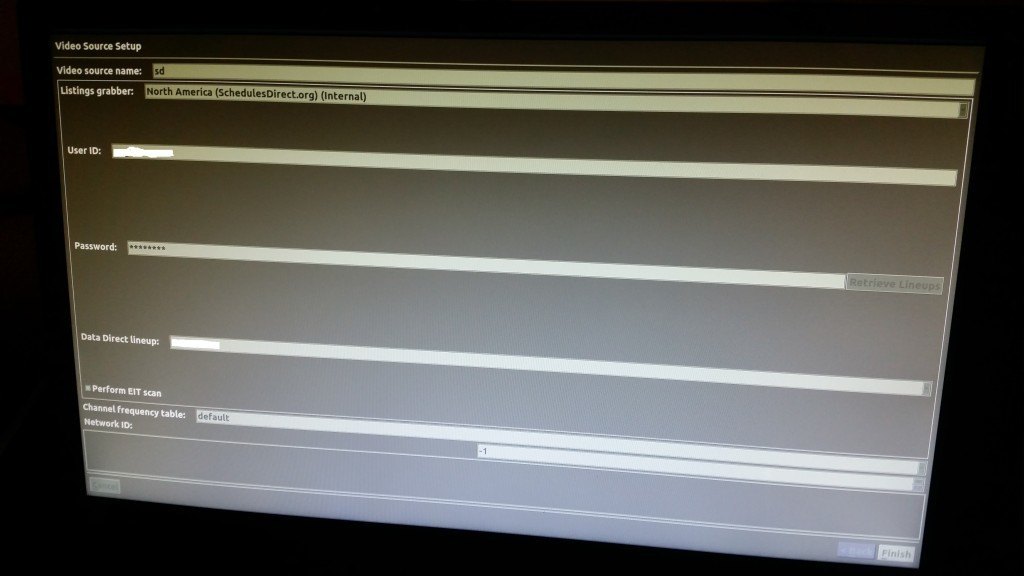
- Under Video Sources select “New Video Source”
- Name it something that makes sense to you like “SD” for schedules direct
- Under Listing grabber select the schedulesdirect.org option
- Enter your user and password for the schedules direct website
- Click “Retrieve Lineups”
- It should auto fill in your “data direct linup”
- click finish and you will now see your new source
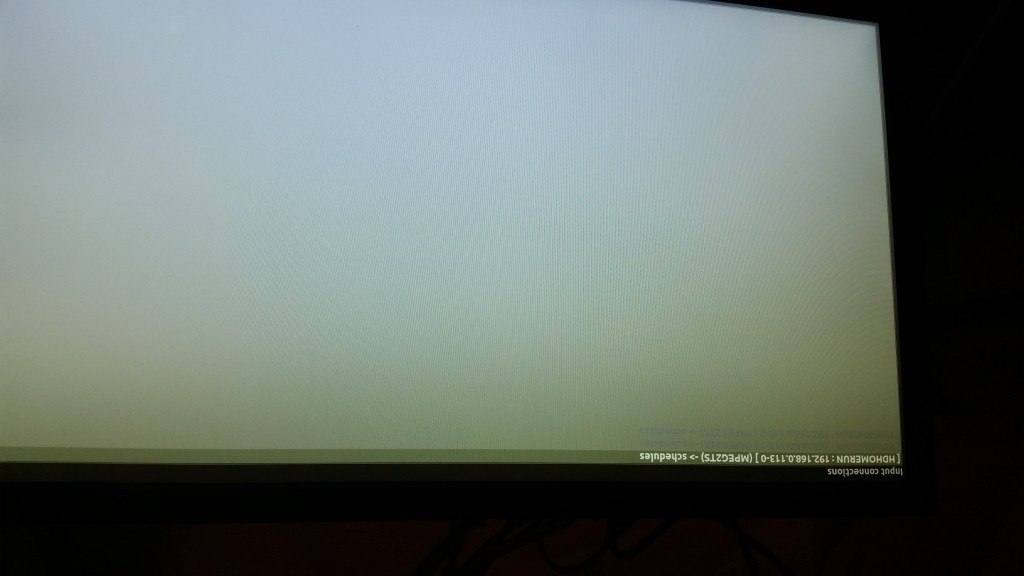
Now we just need to connect up this new video source you created with your tuners. Select Option 4 “Input Connections”. You should see your 3 tuners. Select the first one.
- Insert a display name, I just used HD 1, HD 2, and HD 3 for each of my tuners
- Under Video Source you should only see the new schedules direct source listed; it will be named whatever you called it, select it
- I use the quick tuning option for Live TV only
- IMPORTANT: Click “Fetch channels from listing source” not “scan for channels”
- The Fetch will use the schedules direct and only get you the channels you have on that listing which is what you want
- This step could take a few min depending on how many channels you didn’t filter out in your schedules direct feed
- Select a starting channel as this is the channel devices will start at when started
- Next over, next over again and finish

- Do the same steps above for all your tuners
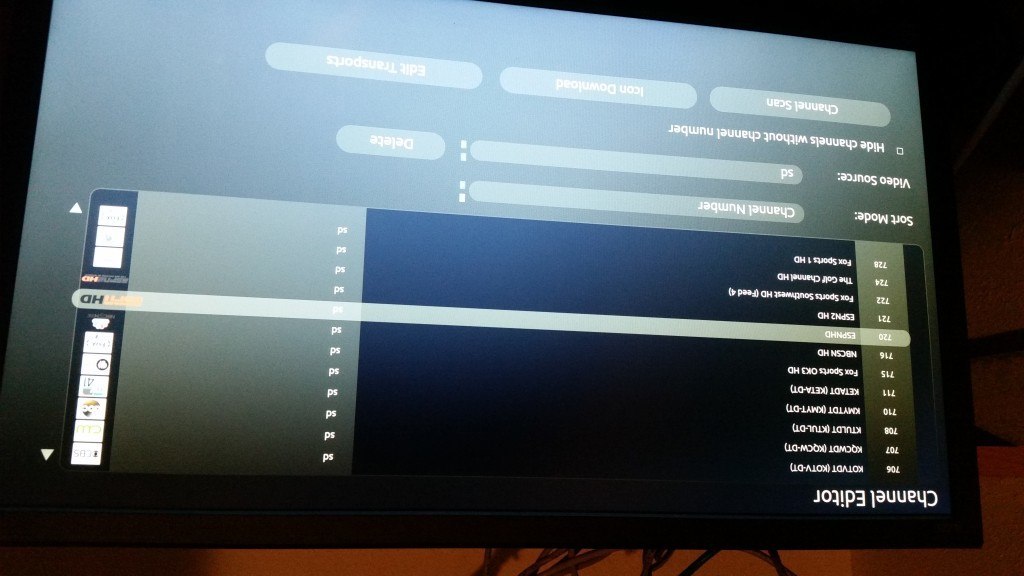
We are almost done with the MythTV portion! Lastly you will want to add channel icons to your channels so they distinguish better on your XBMC boxes. So Option “6” is channel editor. In tere you will be able to select each channel and download icons for them. Some you will have options to choose one while others should be found repetitively easily.
After you have the channel icons like you want them exit out of everything. It will ask you if you want to run mythfilldatabase. You do! This is where MythTV will pull all of the schedules direct listings into your database. What this means for you is your program guide will be up to date.


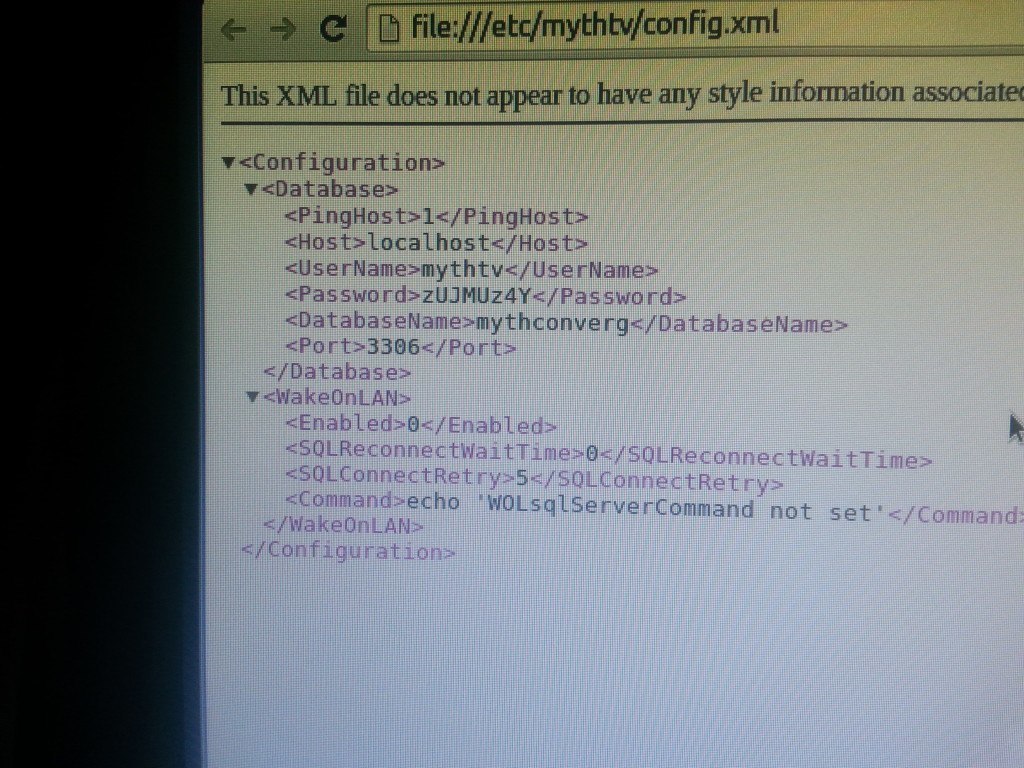
You are done with MythTV. We need to do one more thing on this box. We need to get the generated MySQL password from your machine so the other boxes can connect to it. There is an xml file called config.xml that is located in etc/mythtv/ folder. Open it and you will see the password. Snap a pic with your phone as it will not be one that is easily remembered. NOTE: You no longer need the myth database password if you have updated to Kodi “Helix” or above.
You are so close. Now we just need to access it from our XBMC/Kodi boxes.
XBMC/Kodi Setup
You can read our full media center setup guide starting here if you are not familiar with XBMC “Kodi”. This guide assumes you have at least “Gothom” installed that supports PVR functionality. I would take a min and update to the latest version now anyways before completing this step. Here I am going to focus solely on connecting into your MythTV box from XBMC.
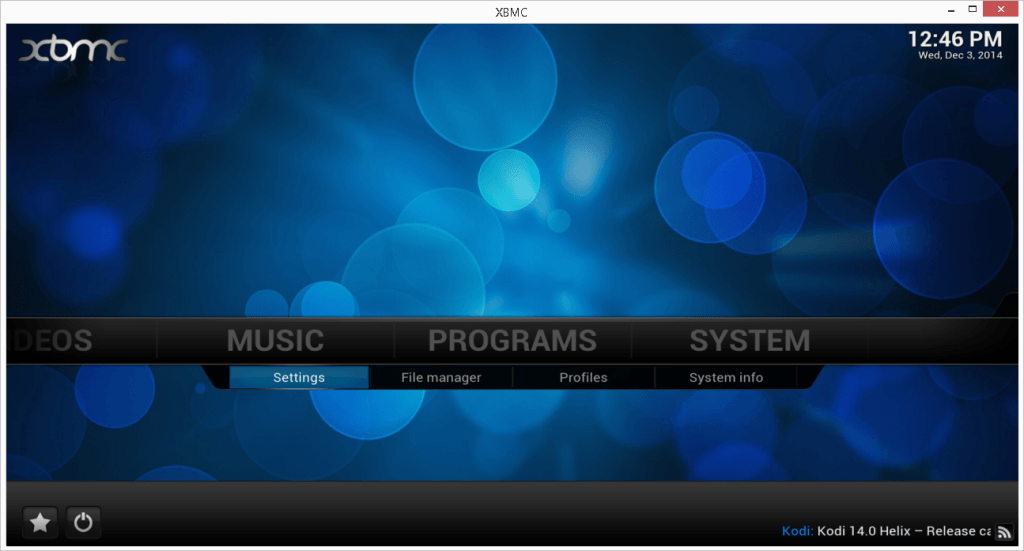
Boot up your Kodi box and make sure it is on the same network as your MythTV box.
Go into System Settings
Then click “Live TV” and check “Enabled” under General
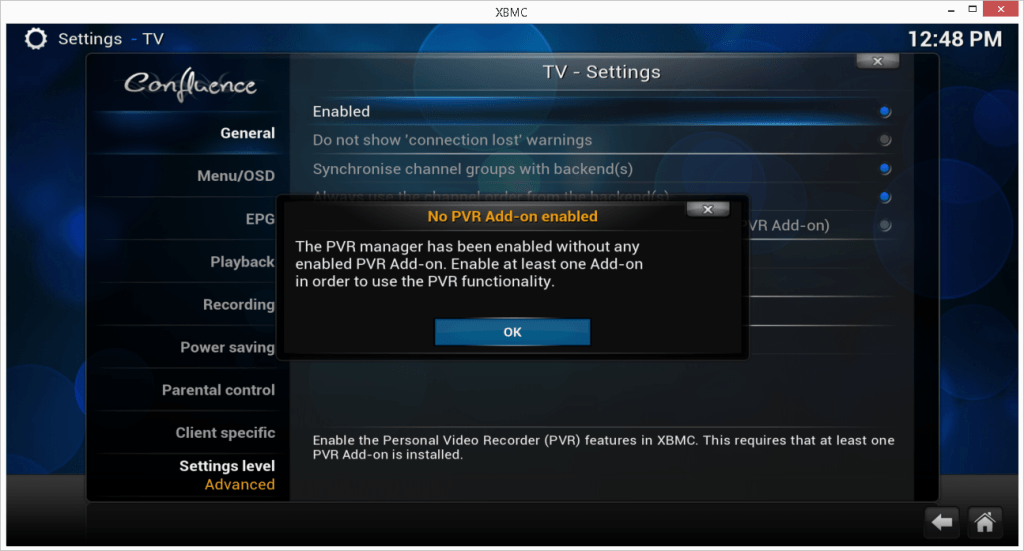
It will prompt you to enable a pvr addon. Click OK and you will be taken where we can configure MythTV

Go into the MythTV PVR addon and click configure. This is where you will input all the settings from the MythTV xml file we got above. This includes the ip address of your MythTV machine on your network. NOTE: You will not have the option to enter a database password in Kodi “Helix” or newer and you will not need to.
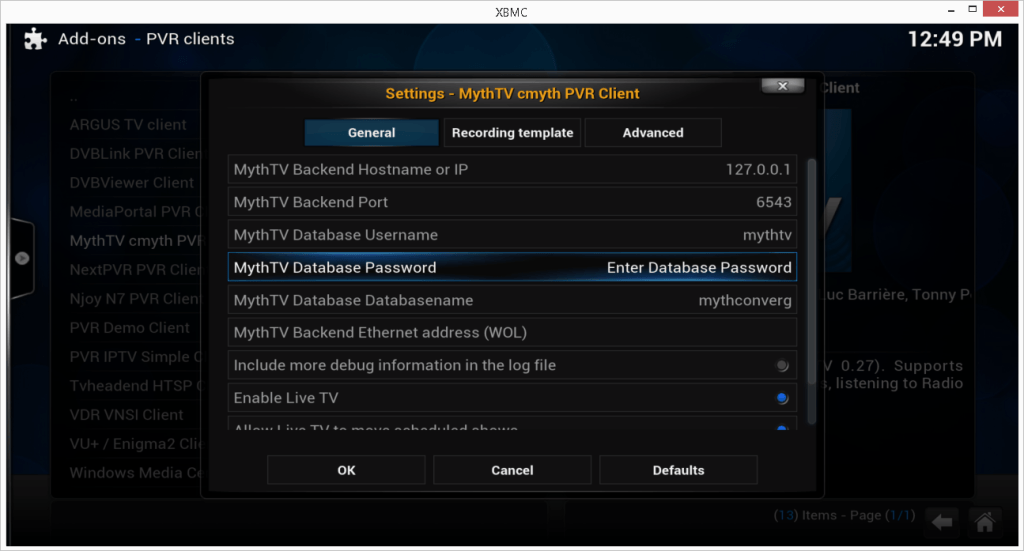
At the bottom I prefer to change the “conflict handling” to “Prefer recording and stop Live TV”. This way my recording take precedence over Live TV.
Click OK, then enable the addon.
 If done correctly you will see all your channels scan in across the top.
SUCCESS! You can now navigate to Live TV on the home screen and start watching TV and your DVR recordings.

Where in your tutorial do you explain where to set up the directory for saving your recorded TV. Also what if I wanted to use that computer as a backend and front end thanks.
To use as a back and front end just make sure and select that option during the setup screens. Both will be installed and configured to each other automatically. For the storage it will set it up automatically. If you want to point to another location for storage, go into the mythtv backend setup and select option 7 “Storage Directories” and set them up to wherever you want to save recording. Good luck
Cox cant get my channels to show up on my card I only get a few of them. did you have problems getting it to work at first?
Yes. They kept telling me it would not work and I would need to get one of their boxes. Fortunately the cable installer was older and patient. He stayed at the house for about 2.5 hours until they got it going. Make sure you have the “tuning adapter” they provide at no cost as well. So the cable card in your HDPrime and the attached tuning adapter should get channels on your network.
They got it fixed.
Great
Hi Ryan, I am in the US and have 3 slightly older dual style Homerun tuners (2 HDHR3-US models and 1 HDHR-US model). A total of 6 tuners that I’ve used, heretofore, with Windows Media Centre. Will these older tuners work with KODI Helix 14 and Myth? Or do I need to buy newer tuners?
Also some of your pics were hard to see sometimes, but it seems to me the MYTH configure screen displayed for your KODI installation had differnt options than mine. Is thi spossible? Or does it matter?
Finally, can I not just make a Linux box and run MythTV, rather than building a specific Mythbuntu box?
Regards
Basil
Great info. Thanks. I posted a query the other day but it seems to have gone missing.:-( A few questions please.
I have 3 slightly older style Homerun dual-tuners (2 HDHR3-US modeils and 1 HDHR-US). A total of 6 tuners currently used with WMC.
Can these tuners be used with your Myth instructions? Or do I need to buy new tuners? I am only interested in Over-The-Air signals.
Can I simply build a Linux box and install Myth? Or is there some advantage in having a Mythbuntu box all to on its own?
I noticed some of your pics were a little hard to read. But I thought some of the screen options shown for the KODI Myth addon were different than shown in your pics. Am I wrong?
Thanks for your help
Basil
1. You will be good with the older tuners.
2. You can definitely use a full ubuntu.
Let me know if you have specific options that are missing and I will help you out.
Thanks,
Ryan
Thanks for the great tutorial, but I am having a little trouble. I was hoping you could help or point in the right direction. Followed your directions. I am installed mythubuntu on virtualbox vm on my iMac. I have it all setup correctly I think. I can open the mythfrontend and the channels play but cannot get it to play on my fire tv running kodi. I clicked on live tv, enable and then choose mythtv as my pvr. I left my ip as local 127.0.0.1. I also tried the ip of my iMac to no avail. On my version of mythtv on Kodi 14.2 I do not have the username or password options. So I basically did not change any options on mythtv configure settings page. There has to be some setting on Kodi that I am missing that is not allowing me to see the mythbackend or something. If you could help I would greatly appreciate it. If you can, please email. Thanks
I think that IPv6 addressing configured in the default Mythbuntu setup can mess things up a bit. If you leave the IPv6 addresses blank some problems go away. At one point I had part of the system trying to use a localhost (IPv6 ::1 equivalent to 127.0.0.1) instead of a different machines IP address.
Not finding myself impressed with MythTV so far. It is showing its age.
Excellent tutorial. Wish I had it a few years ago… I have several XBMC/MytTV/HDhomerun systems which work fine. Just upgraded one (Openelec on Raspberry PI) to the latest version (KODI). Everything works, but under “Live TV – TV channels” each channel shows up three times, suspect one per tuner. On the older systems they only show one channel each. Can somebody point me in the right direction? Thank you!
You might want to clear out your mythtv setup and reconfigure. Sounds like your myth maybe still has the older data feeding on your network.
It turned out to be a bug in Kodi 14 which was discussed in their forums. I saw it in Openelec 5.08. Just tried out the RPi Beta 5.95.3 and the problem is gone.
Hi Ryan-
I,too,enjoyed your tutorial. I am having problems with my setup and am about at my wits end. I have my myth backend and frontend running under mythbutu on a dedicated machine. All is working well with that setup. I am trying to setup a new fronted on my G-box Q using Kodi Helix. I am running the Q to my network wireless and have a strong signal. I am able to stream Netflix, Hulu, and U-tube perfectly. After I go through all your instructions, I cannot get the Live TV to show up on my Kodi menu bar. I have my IPV6 address setup as 192.168.0.106 in the backend as myth suggested when I did the setup. I have the same IP address setup in the myth pvr in Kodi. What am I doing wrong? Thanks in advance.
Here is a snap shot of my settings on the latest Kodi version MythTV Client Addon Settings
Thanks, Ryan. I’ll try it this weekend. Can you also post a shot of your Myth backend settings page which shows the IP addresses?
Thanks, Ryan. I will work on this problem over the next couple of days. Can you post a screen shot of your Myth backed setup page that shows the IP addresses?
Great tutorial. I am stuck on the part where I click on Fetch channels from listings source. When I click on it nothing happens. I do have my video source configured properly and know the schedules direct is working so not sure what the problem is. Has this happened to anyone else? FYI – I a using a HD Homerun tuner (no cablecard).
Did you get it going? Sometimes I noticed it takes some time for schedules direct to populate where myth can pull it down.
Nope. Never did get it to work. Is something supposed to happen while I wait. I did give it a good 15 minutes but the screen never changed.
I ended up scanning a couple of channels to test out but when I open Kodi and go to Live TV I get an error that says No PVR Client started yet. Check Logs. Check my logs and it looks like it is not connecting.
“Failed to conect to MythTV backend on 127.0.0.1:3306”. I know that the IP address is correct because in the Virtual Box if I open a browser and put that address (without the port) in I get the MythTV page but when I go back to Windows and try using the same address in my browser I get nothing.
Any help is appreciated.
Are you running this in virtual box? If so instead of a bridged connection for the virtual OS nic you need to choose the option that will give the virtual OS aN ip from your router that will be similar to the address of windows. The address of 127.x.x.x is not accessible except from the virtual OS and not outside of it. Hope that helps some.
Thanks for the help. Any suggestion on which option I should choose then? I assume the virtual box needs to have an internet connection to download the Schedules Direct info. Thanks!
Sorry on my phone right now but take a look at this. Look at the port forwarding section or the bridged option.
https://www.virtualbox.org/manual/ch06.html
Oops forgot the link
Thanks but the port forwarding thing is a bit over my head. I did attempt it though but no dice.
I went to Settings then Network and chose NAT. I then hit Advanced and then Port Forwarding and added 2 rules – both with TCP protocol. Rule is forwarding 127.0.0.1 (Port 6543) to 192.168.0.123 (Port 3456). Rule 2 is forwarding 127.0.0.1 (Port 6544) to 192.168.0.123 (Port 4456) and in Kodi changed the IP address to the 192.168.0.123 and the ports to the ones I forward to.
Unfortunately still getting same error. Any guidance would be greatly appreciated!
try it in bridged mode. It should get a new IP address in the same range as your windows box instead of the 127.x. Then you can use that address in kodi.
I actually started choosing Bridge Adapter (as per the tutorial) but that did not work. Is that what you are referring to? Did not see a Bridge Mode under NAT.
I am spinning up a lab setup so I can take screen shots to help with this.
give me a little while and I will post some better answers
ok so if you open terminal and type ifconfig you will see it has a ipaddress that is not in the same range as your windows box
http://i.imgur.com/u1gUOQh.jpg
http://i.imgur.com/blFT2Wy.jpg
change the network type in virtual box of the mythtv VM to bridged and wait about 10-15 seconds and type in ifconfig again
you will notice now that is has an address almost like your windows box.
http://i.imgur.com/6wX5YmO.jpg
now we need to tell the mythtv server what ipaddress to listen on.
click on mythtv backend setup and say yes to do you want to stop mythtv click on general then change the first field from 127.x.x.x to the ipaddress you saw after you put it on bridged mode. then just hit next till you are back to the main screen and the ESC to get back to the desktop. it should ask if you want to start mythtv and do the database thing say yes to both.
now on your windows box type in the ipadress in internet explorer followed by the port and you should see the Mythtv page. Now your KODI should work. just remember to change the address in kodi to the new Mythtv address.
http://i.imgur.com/fzGlZIH.jpg
http://i.imgur.com/spB0Nts.jpg
Hope this helps you get it going.
put the virtual box NIC in bridged mode. then run the Mythtv back end setup. Click general and change the address in the top option to the address that isn’t 127.0.0.x don’t change anything else but take note of this new address. click next till it takes you back to the main screen. click ESC and say yes to start mythtv and to the database question. now you should be able to open internet explorer on the windows box and go to http://x.x.x.x:6543 and it should work.
now update KODI with this new IP in the setup of Mthtv and it should work.
you can see some screen shots of this at this address
http://imgur.com/a/w1FBn
Holden
Thanks for all your help. Looks like I may have finally gotten this to work. Took me a bit though because I kept on getting a “System Program Problem Detected” error in the VB and that would force the backend to close down. After a bit I just decided to ignore the error and restart the backend and it seems to be working.
Now to try and see why the Fetch Channels From Listing Source is not working. I suspect it has something to do with schedules direct but am not 100% sure. For now I did a manual scan and it seems to be working okay.
Thanks again!
Spoke to soon. I restarted my PC and Virtualbox and now am getting an error on the Front End of Mythtv that says “Could not connect to the master backend server.” Once I escape out of the front end I get the Sytstem Program Problem Detected messaged. So close yet not there. Will keep trying – installing and uninstaling.
Nothing worse then it working just to stop on reboot!
I am wondering if it has something to do with me doing all of this remotely (via TeamViewer) from work and if that is conflicting somehow. Will try again later tonight.
Hopefully that is it.
Success! So after hours of searching and searching (and a wife who was about to make me sleep on the couch because I could not stop obsessing about finding a fix) I have finally got this working.*
The reason the backend kept on crashing and I was getting the System Program Problem Detected error was because on the General setup screen – where I would change the ip address I was supposed to change it not only on the top but also on the bottom. Once I did this it is working great!
* The only issue I still have is the Fetch Channels part so did a manual scan.
Thanks everyone for your help!
Glad you got it working!
Cox customers trying this setup beware: Coz imposes Digital Rights Management on all but local channels in many if not most of their markets. That’s where I am…everything set up and ready to go with my CC and HRPrime, but no channels (other than local or Cox promo channels) — all because of DRM as a way of trying to force me to rent more STBs from Cox.
If you used some magic words to get Cox to hit your CableCard and clear the DRM, I’d love to know what they were. Only hope right now is to keep an old Windows box with WMC going, which can play all the channels. Very, very frustrating.
The is unfortunate. I have Cox and only HBO has DRM. Everything else works great.
I also have Cox in OK with this identical setup and am DOA with DRM channels. You can view DRM channels only on WMC or the PS3 (not PS4) and via the Homer View app on Android devices. Myth is essentially useless for me. Hate it, because the clear channels and full home networked DVR work perfectly.
Are there more channels than just HBO that have DRM? That is the only one I found, but have cut back to just local channels through cox.
Hi Ryan
Is it possible to add network location for the tv recordings?
if it is how ?
Thanks
Himala
I am not sure what you are asking? If you are asking about downloaded tv shows then yes you just add them through videos -> add videos and then select the location.
Thanks for all the great information on this system. I am sure that I will be using it. I am very new to all of this, so I am wondering how might this be different from a whole house audio video set-up with zones, etc. It seems like kodi can handle both the audio and video from what you have written, but what would be the difference? I am sure that I am not understanding some things…but probably should just get started with the basics as you describe them and go from there. Thanks again!
Randy, can you expand a bit as I dont follow you fully. You could have a Kodi device in any room and have access to your tv and shows.
thanks for this article I really enjoyed it
what a great article
Can I just use a hdmi cord and run kodi thru my tv using att router and WiFi. It worked fine the 1st night then router crashed