
HyperSpin Controller Setup with JoyToKey and Gamepad
This guide will show you how to setup gamepads including our usb encoders in HyperLaunch and HyperSpin. If you have not yet, please be familiar with our Setup HyperSpin MAME and HyperLaunch – The Full Guide as it shows you how to install and setup the system. This is the next step is the HyperSpin Controller Setup.
Please check out our control panel kits as they will save you a ton of time setting up your new arcade.

We also just released our first CNC Bartop Arcade Kit if you need a cabinet. Goes together via camlock system with just a philips screwdriver. You can even get high quality graphics.

So the first thing you want to do after plugging your gamepad into your computer is to verify you have everything connected up correctly. This guide will assume you are using Windows as HyperSpin Controller Setup is only compatible on Windows. Side note: Check out our Raspberry Pi – The Light Weight Retro Gaming Console guide if you want a small footprint computer to run your games.
Here is a video walk through of setting this up with the blog explanation below.
Setting up the Joystick in Windows
Go into Control Panel / Hardware and Sound / Devices and Printers

You will see your gamepad in there. Ours usb encoders will show up as a Xin-Mo GamePad. The video is a walkthrough of that, I will use a Xbox 360 controller for this guide as the principals are the very same. Once you locate the gamepad, right click and select Game Controller Settings. You will see it listed, highlight and press properties, then start pressing joysticks/buttons to ensure it is responding as expected. If one button is not then check that connection. If nothing is working then check your ground wire.
Now that we know Windows is seeing our gamepad properly, let’s get it integrated with HyperSpin/HyperLaunch.
JoyToKey
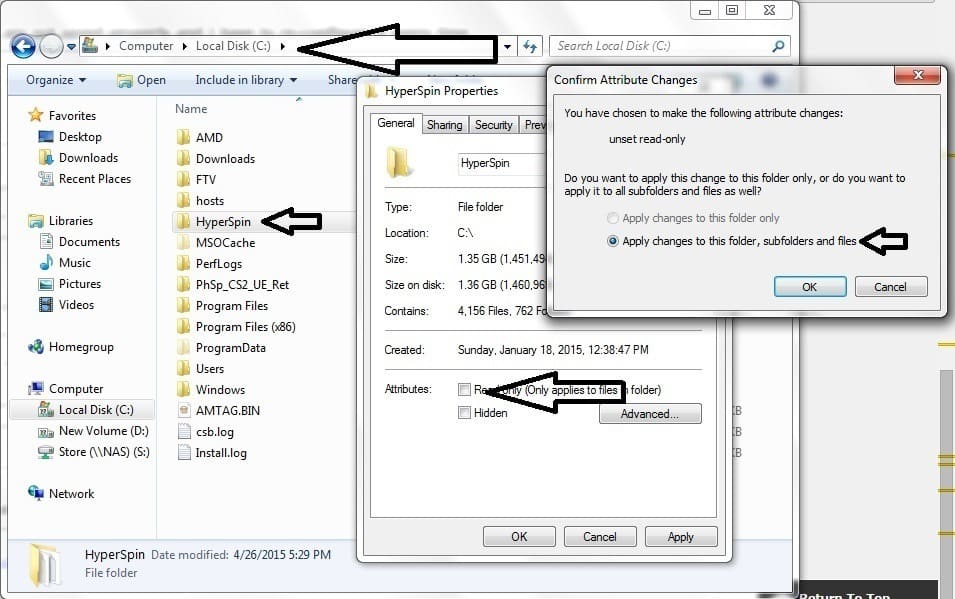
HyperSpin does not play well with gamepads in general. The system prefers keyboard strokes. This is not a big deal as there is a free program that integrates with HyperSpin called JoyToKey. Essentially JoyToKey will take your joystick/button presses and convert them on the fly to a keyboard key stroke. You may have also read about a program called Xpadder. It essentially does the same thing and this guide will be the same in principle, but I have always seemed to have better luck with JoyToKey and I think you might too. First thing you want to do is make sure you HyperSpin folder is not “Read Only” as that will give us some issues down the road. Go to you C:\ drive and right click the HyperSpin folder. Ensure it is not “Read Only”, if it is then uncheck that box and apply to all subfolders. If you get something later about unable to find joytokey.ini file, this is your issue.
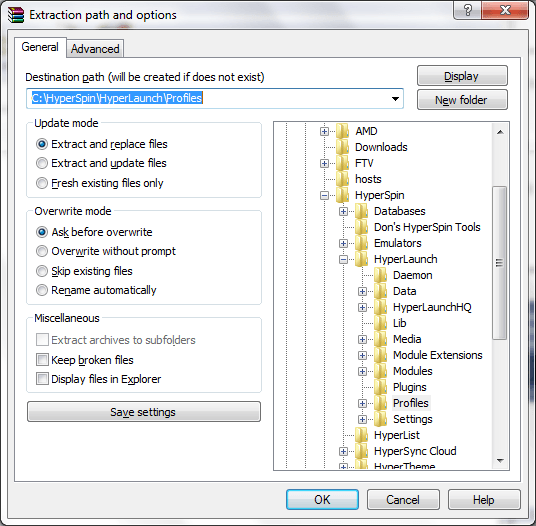
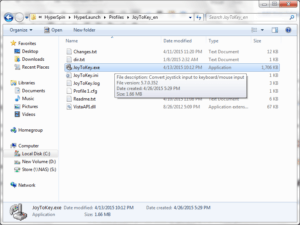
Let’s get JoyToKey installed by going to http://joytokey.net/en/download and downloaded the zip file. Once downloaded extract it into your HyperLaunch folder. I put mine in C:\HyperSpin\HyperLaunch\Profiles\JoyToKey_en.
Integrating with HyperLaunch and HyperSpin
Again, if you are not too familiar with HyperSpin, HyperLaunch, and MAME please refer to our guide Setup HyperSpin MAME and HyperLaunch – The Full Guide. Assuming you know the basics, open HyperLaunchHQ.
The first thing we want to do is make HyperLaunch aware of our JoyToKey.exe file.
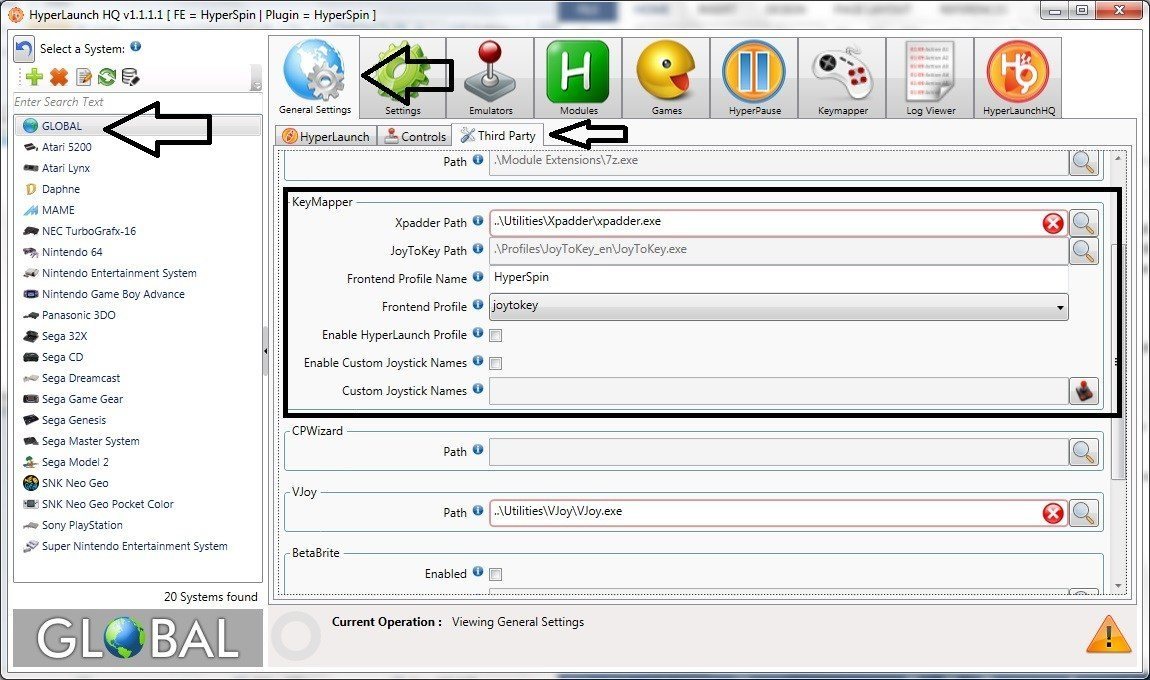
- Go to the “Global” System
- Select “Third Party” tab
- Scroll down to the “KeyMapper” section
- Hit the magnifying glass under the “JoyToKey” Path and navigate to your JoyToKey .exe file
- Frontend Profile Name enter “HyperSpin” without the quotes
- Under “Frontend Profile” select “joytokey”
- Check the box for “Enable HyperLaunch Profile” (not in picture below, but you need it checked)
Now that HyperLaunch is aware of our JoyToKey install let’s make sure the setting use it.
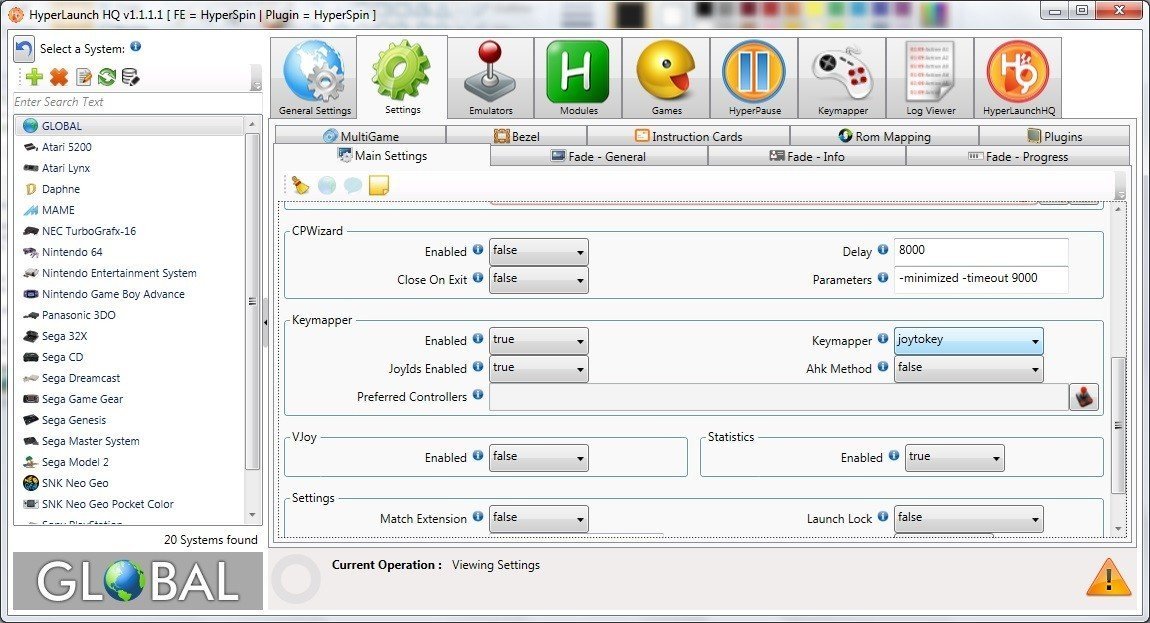
- Select the “Settings” tab
- Under the “Main Settings” tab find the “Keymapper” section
- Set Enabled to “true”
- Keymapper to “joytokey”
- JoyIds Enabled to “true”
You will be using JoyToKey in a few different ways depending on how you want your controls to work with the frontend (HyperSpin), the Launcher (HyperLaunch), or the game system (Emulator). Let’s start by configuring a JoyToKey “Profile” for HyperSpin.
Just to reiterate. We are going to turn our gamepad joystick/button presses into keystrokes that HyperSpin expects. What does HyperSpin expect? You can find/configure that in HyperHQ (Not HyperLaunchHQ). Open HyperHQ which is located in your C:\HyperSpin Folder.
Under the Controls tab and Keyboard tab you will see the keystroke HyperSpin expects for different maneuvers. For example player 1 right by default is the à key on your keyboard. Genre is “G”, etc.

We will want to make sure and note these. If you have conflicts with a keystroke, you can change it here and update your JoyToKey profile to account for it.
IMPORTANT: Do not select the checkboxes under the joysticks tab. This will only give you problems as HyperSpin and gamepad support is shaky at best.

Now you can see the default controls for HyperLaunch in HyeprLaunchHQ (not HyperHQ).
- Under system “Global”
- Global Setting tab
- Controls Tab
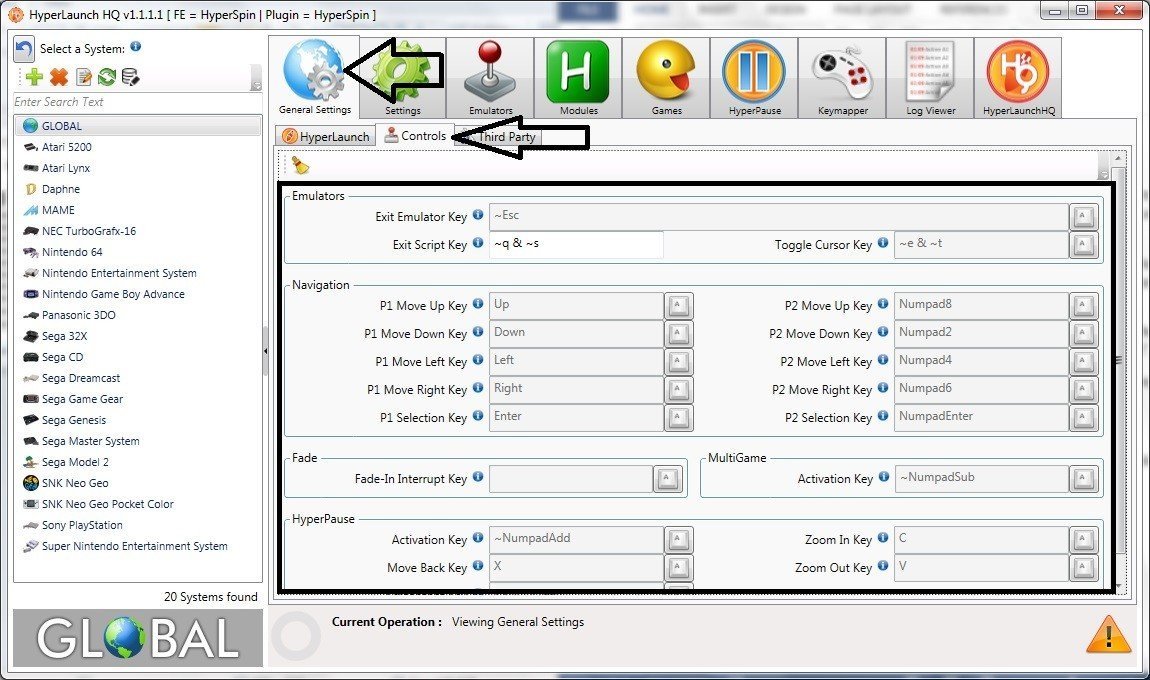
Hyperlaunch controls are any time you are launching a game, while that emulator is running, and to exit back to HyperSpin.
All the keystrokes are valuable, but the exit emulator key is what the system expects to exit our of your game system (emulator) back to HyperSpin. Also the Numpad+ button will put you into HyperPause where you can view game moves, artwork, play stats, etc .
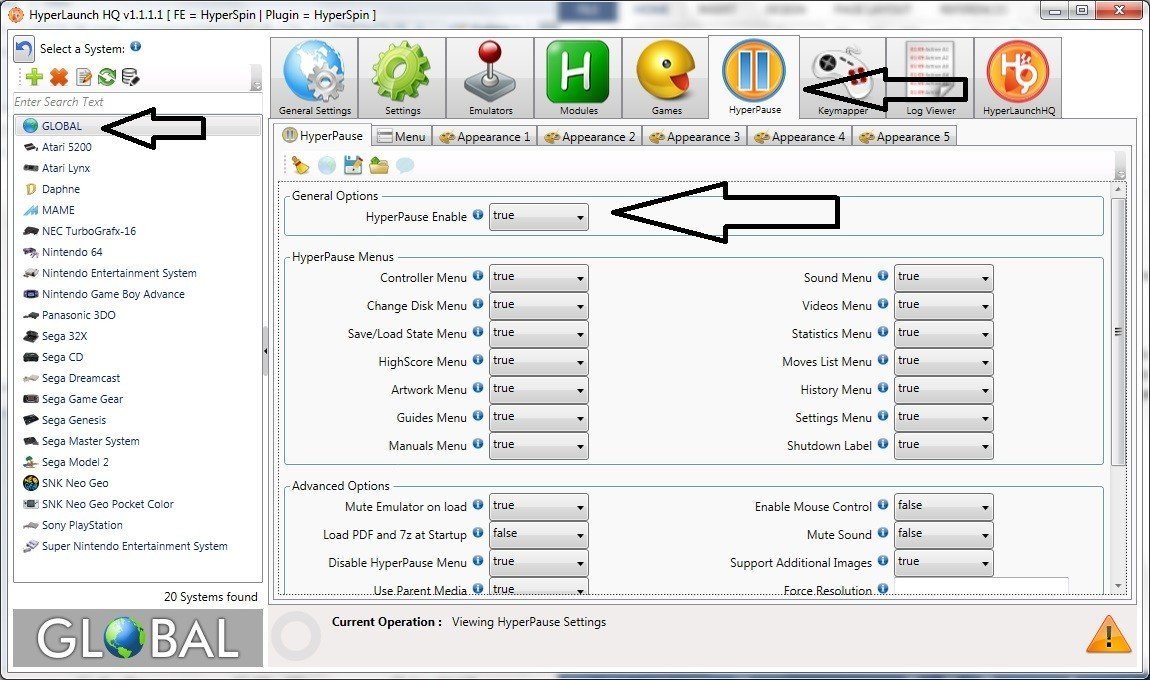
You might want to enable HyperPause on Global system, HyperPause tab
Setting Up JoyToKey profiles for HyperSpin and HyperLaunch
So now we know what keystrokes the system is expecting, let’s get our gamepad to output those based on the buttons/joysticks we want. This will all be done in HyperLaunchHQ.
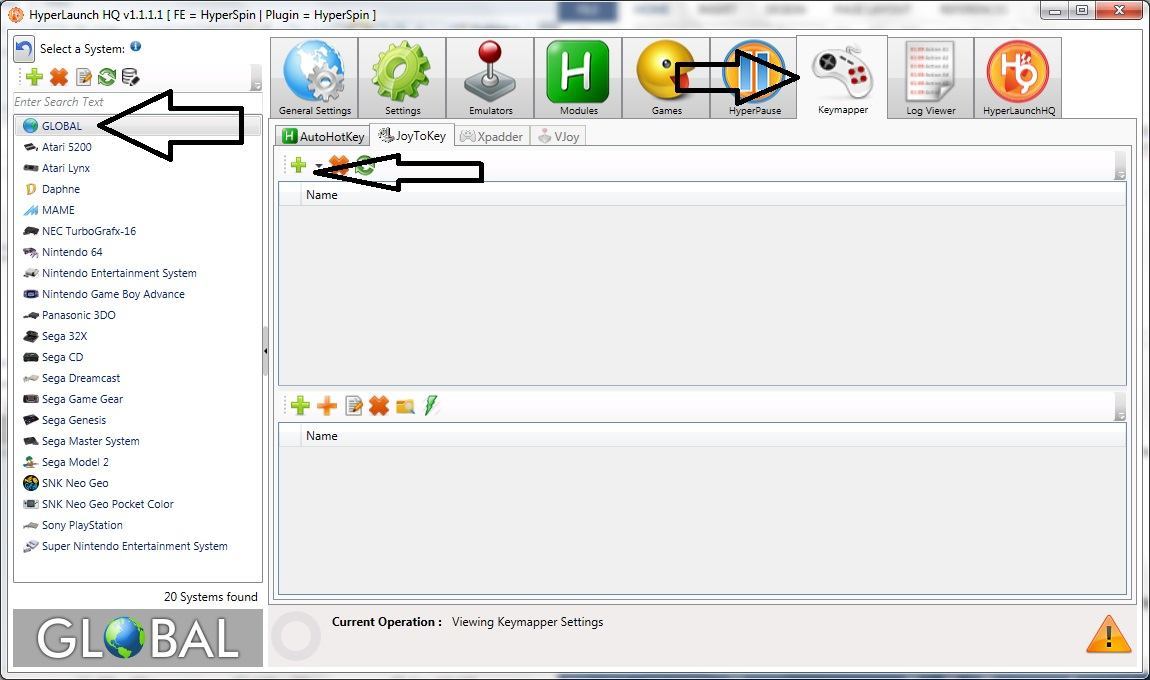
In HyperLaunch HQ
- Global system
- Keymapper tab
- JoyToKey tab
Hit the dropdown next to the top plus sign and select “Frontend” as this is where we will configure the gamepad to work in HyperSpin.
This will open up JoyToKey. You will notice it will auto detect any attached joysticks. In my case the one XBox 360 controller. When you press directions on the joystick or buttons it will highlight on that joystick and the press. Make sure it is acting as expected like you did previously in control panel.
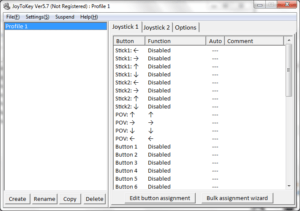
So a quick rundown of JoytoKey – Definitions…
- The profile or button/keystroke settings is on the left that will launch with a given system
- The “Joystick” tab correlates to the number of gamepads you have connected
- The “Button” column is the different options for the gamepad
- The “Function” is the keystroke you want to be sent to the system when that function on the gamepad
- You can add auto or comments, but we will not need that here
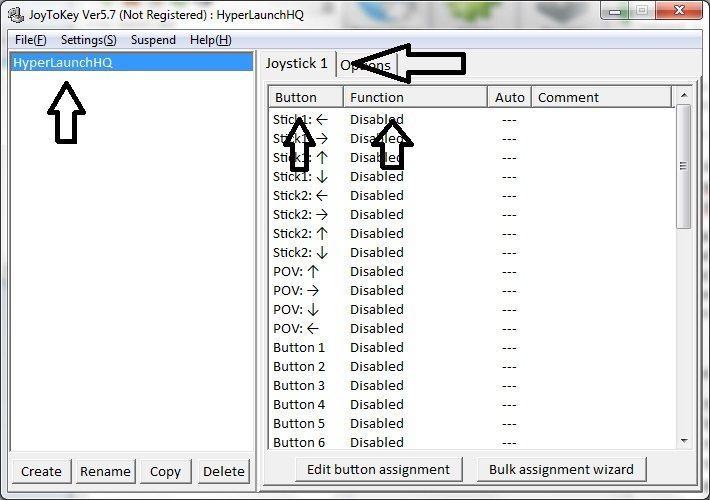
Now we want to configure this profile to the HyperHQ settings we saw before. To do this, I will start by double clicking the “Stick1: left” at the top for player/joystick 1. Note: as soon as you double click it, it will be waiting on you to press what keystroke you want (highlighted in yellow). I will press the <– key on the keyboard. If you mess up, click in that box and press the correct key on the keyboard.
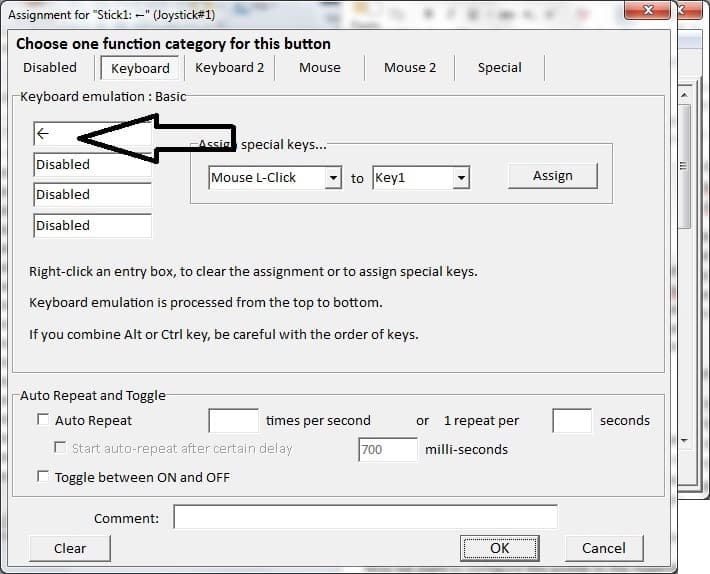
Continue this until you get all the controls for HyperSpin how you want them. There is not a lot to HyperSpin controls so it should not take you long. Example

Once you have the gamepad sending the correct keystrokes for the correlating joystick/button movements make sure and file/save then close joytokey.
Back in HyperLaunch HQ you will now configure the HyperLaunch controls. Press the down arrow to create a HyperLaunch Profile. Do the same thing as before, but this time for HyperLaunch using the HyperLaunch default keys you took note of earlier.

Ok. So now you should be able to navigate both HyperSpin and HyperLaunch. Let’s go ahead and test it out. We will not be doing a MAME joytokey profile, but setting up gamepad controls directly in MAME. Launch HyperSpin in your C:\HyperSpin folder. Ensure the controls are working as expected for the frontend.
Setting up Controls in MAME
We will setup other controls in joytokey, but mame works great with gamepads. To setup controls in MAME simply boot any MAME game and press the “tab” key on your keyboard. You can configure controls specific for that game or configure controls for all games. It is typically best to set it the first time for all games then setup individual games later if you want them to have unique controls. Just land on the control you want to configure, press the enter key, then press the corresponding key on the gamepad you want for that action.
The major controls you want to set
- UI Cancel – This is the button that exits the emulator
- Under Other Controls the player start and coin buttons
- Then the player buttons
Setting up MAME is in the video at the top of this post if you have issues.
Setting Up JoyToKey Profiles for Other Emulators
You could setup other emulators the same way as MAME directly with the gamepad settings. I want to show you how to set one up here just so you have the tools to do it with the keyboard strokes as well.
Select a different system in HyperLaunch HQ. I will do the Nintendo Entertainment System in this example. Select the specific system on the left, then keymapper tab, and then the down arrow.

If you set it for an emulator profile then it will load this joytokey profile for every system that uses that emulator. Helpful if you have a lot of system running off a single emulator like MESS or something. I will set it up for the “system” so these controls only work for that system. Setup your gamepad the same as we did above depending on how you want it to work your NES. You can go into the emulator first and see what keyboard controls it is expecting then transfer those into your joytokey profile.
Here are the default controls for Nestopia emulator.
Important for Getting it to launch
You may notice your joytokey is not working properly upon launching HyperSpin. We need to do a couple things first.
Navigate to where you joytokey exe is located and launch it
It will launch with a default profile call profile 1.
Configure this profile the same as you did for HyperSpin above and then press file, save. This will put a Profile 1.cfg in the same folder as your exe file. It will load this profile (working HyperSpin) upon launching HyperSpin. HyperlaunchRocket Launcher will take over from there loading profiles as you change systems and go in and out of HyperSpin.
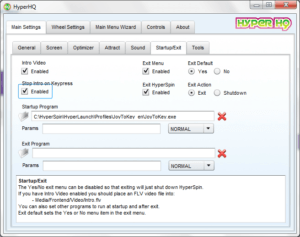
We also need to have joytokey launch when we launch HyperSpin. We do this by going into HyperHq (not rocketlauncher). Go to Startup/Exit and set joytokey.exe as the startup program.
Now when you launch HyperSpin it will launch joytokey and load profile 1 which is configured for the main hyperspin controls. From there hyperlaunch/rocket launcher will load the correct profiles.
Conclusion
If you have made it this far then you are pretty much there as far as the frontend, launcher, emulators, and controls. JoyToKey profiles are a powerful way to get your control panel configured/tweaked exactly how you want utilizing keystrokes. If you want to tackle the next step in your arcade Nirvana, check out our tutorial on how to configure guns in your HyperSpin setup. I love them. Let me know below what you think about HyperSpin! Also subscribe to our new letter to get guides like this as soon as they release.
Good Luck